 Lists
Lists  Lost + Found
Lost + Found |
Front Office  Lists
Lists  Lost + Found
|
|
The Lost + Found list enables you to manage items which have been forgotten or lost by your guests.
The three status details Lost items, Found items and sent enables you to portray the work flow from finding an item to its being sent to the guest.
 Lost items - the item has been reported as lost.
 Found items - the item has been found and is available for pick up.
 Sent - the item has been sent to the guest.
 Before entering an item as being lost or found, it is recommended that you check to see if the item already exists in the list. You will find more information with regards to this in the section below entitled Searching for an item. Should there not be an entry for a reported or inquired item, you can create a new search entry:
Item:
First, enter a description of the item (e.g., “teddy bear”):

Guest / Room allocation:
a) If you know the name of a guest, enter the guest’s name into the Guest field or use the  button to start a search of the guest profiles to find the guest’s name.
b) you can also select the room from the drop-down list next to Room to find the guest’s name. Should the room be occupied, protel will show you the name of the checked in guest after clicking the [Search Reservation] button.
If both bits of information are available (guest name and room number / room name), please allocate the both of them. The fields can be left empty should the guest and the room be unknown.
Location:
Should the item have been found, you can enter the location where it was found:

The selected locations in the list correspond to the departments set up in the system data.  Hint: The field can also be manually overwritten!
Description:
The Description field enables you to enter a detailed description of the lost item.
Document:
Ideally you keep a document or image of the found item as an attachment:

 The Housekeeping App for the iPhone makes it especially easy to manage your images. Simply take a new picture and upload it!
Status:
Please click - has the item been reported as Lost or has it been Found? Enter the corresponding date next to it.
Click the  to add an item to the list. protel saves the current date and the name of the registered user.
|
HINT:
|
The search for items is recommended at the beginning of each new entry into the list, thus avoiding double-entries.
By clicking the respective option, you determine whether or not all, only lost, found, or sent items are to be displayed:

Enter the time-period in which you would like to search. The date on which the item with the respective status (lost, found, sent) was entered, is decisive for the search.
 Version 2014.18.660
  You can also search for a specified item number. The item number is automatically generated by the system when entering a new item.
Enter a search word into the text search field. Searches can be based on the item’s description, notes, guest’s name, place where item was found, or the name of the room.

MPE installations:
You can limit the selection to an MPE hotel. If an MPE has a head office the guests can contact, for example, you can direct your search to all of the hotels (via HQ) or to only an explicit hotel: :

Click the [Apply] button to start the search.
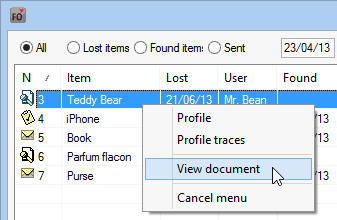
Is there an image or a document for the item? Click the [View] button to open attached files any time. Or right-click on the entry and select “Document” from the context menu:

Two scenarios are possible when allocating the “Found” status: Either a new entry with the “Found” status is created because an item has not yet been retrieved by the system, or the found item already exists as a “Lost” item and has not yet been switched to the “Found” status.
 Use the search function to see whether or not you can find an item in the Lost + Found list.
In both cases you should enter your comments into the “Description” field, for example who found the item:

Should a found item have been forwarded to the guest, this can be documented accordingly.
Truly clever: The guest’s address can be accessed either directly from the context menu by right-clicking the item in the list, or via the  button.
Search for the corresponding item and tag it in the results list.
When changing the date, also change the status to Sent and then click the [Edit] button.
Of course, you can always save files to an item at a later time, e.g., after a guest has sent you a digital image of the lost item.
Select the item and click on the button to open files located at the bottom of the window:

Click the button  to save the attached file.
Should a found item be compiled without a guest profile, you can complete this at a later time.
Tag the item and allocate it to a certain guest by entering a search text into the Guest field and clicking the Search Guest button:

Click the button  to save the attached guest.
Delete the attached guest by clicking the [Delete guest] button.

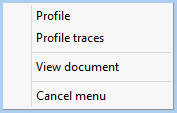
With a right-click on the item in the Lost + Found list, you can open the context menu. Please note: the context menu will only appear if the item has been linked to a guest profile or a document.

Profile: Opens the linked guest profile’s “Addresses” tab.
Profile traces: Opens the linked guest profile’s “Trace” tab. For example, keep an auto trace on record which automatically points out a found item (useful if the guest will be expected again shortly and the found item is to be returned to the guest directly at check-in).
View: Opens the attached file (e.g., image file).
|
The “Profile” and “Profile traces” are only available if the item has been linked to a guest profile. The “View document” command is only available if a file attachment has been created for an item. |
|
|
Available Settings |
|
|
|
|
Available User rights |
|
|
218 |
FO delete Lost + Found |
Entitles the user to delete items from the list (right-click > Delete). |
|
267 |
FO Lost + Found |
Entitles the user to open the Lost + Found list. |
|
268 |
FO Lost + Found editing |
Entitles the user, to edit the description of a found item. |
|
269 |
FO Lost + Found entry |
Entitles the user, to enter found items into the list. |