 Sales Activity Manager
Sales Sales Activity Manager
protel manages a central data base for all activities. Getting in contact with a client is considered as an activity, saving it either under the status ‘Open’ or the status ‘Cleared’.
The Activity Manager is the daily working tool of the sales staff, managing appointments or activities.
The display of the activities is done in a calendar like listing that can be filtered according to certain criteria.
In the upper part of the dialog box, you may activate the checkboxes  High, Medium, or Low, according to the different priorities. There is also the possibility to search for cleared or open activities, or only for timeless ones. You may also limit the search result by supplying a period of time through the fields ‘from’ and ‘to’, by choosing a specific week from the pick-up list or even by using the button Today obtaining only activities for the current date.
On the right side, choose for which user you would like to view the activities. Just Drag and Drop the chosen user into the left side listing.
The color coding of the activities has the following signification:
|
Black |
Activity with time mention |
|
Blue |
Activity without time mention (open) |
|
Red |
Activity of high priority |
|
Green |
Cleared activity |
|
Pink |
Automatically generated and cleared activities from the mailing wizard. |
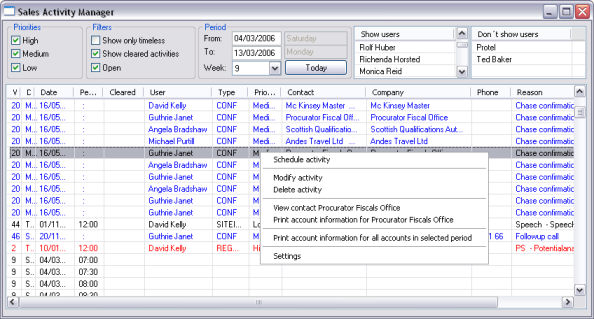
Use the context menu to create a new entry. It appears if you right click your mouse in the listing and offers two possibilities for a new entry.
You may position the mouse on the desired date and the correct timing and open the context menu. That way the time information is automatically copied over and set to the top position in the context menu. If you choose this option ‘Schedule Activity on … at…’, the given timing in this dialog will be saved as a new entry. This option is only available, if no other entry exists at that time, to avoid double bookings of appointments.
If you wish to schedule an ‘Open’ without timing or an activity for a later point in time, choose the second option on the context menu ‘Schedule Activity’. (If you position the curser on an already created activity, this entry appears first). In this case the time field remains empty and in the date field shows the current date.
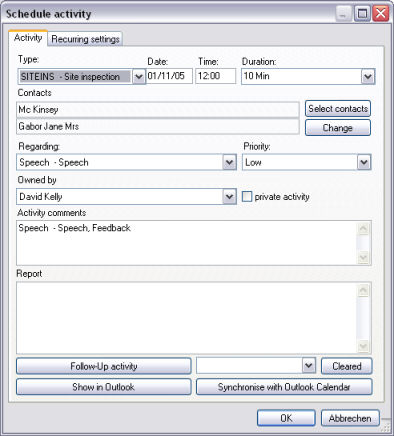
Choose a type from the pick-up list. The type corresponds to the activity types created in the System Data. If not already filled by the system, enter date and time and estimate the duration of the activity. Should there be no time set for an activity, it is considered as ‘Open’ for the concerned day.
Now find the corresponding guest that should be contacted. Therefore use the button this will start the search in the guest profile. Once the client chosen, his name is filled-in in the second row under the section “Contacts”. Clicking on the button allows you to see the profile of the particular client.
From the pick-up list "Regarding" you may choose a sub-activity that was previously created in the system data. Choose a priority from High to Low. Activities with high priority are displayed in red in the Sales Activity Manager.
From the pick-up list ‘Owned by’, choose a Sales staff, who will handle the activity. If the checkbox private activity is tagged, no other user, than the selected sales staff, can see the activity.
In the free text field ‘Activity comments’ the scheduled activity may be detailed further.
The sales report shows the result of contact establishing. In here a longer text may be written that remains at your disposal for later use. The Sales Report can also be printed automatically by the user as a proof for activity.
An activity can be created by each staff for every staff.
Once the activity is finished, click on the button . The activity is then marked with the current date and will only be visible in the list if the checkbox Show cleared activities is activated. You may optionally select a Status ‘Cleared’ from the pick-up list, in order to differentiate the Status. This has been created previously in the System Data.
Should you wish to create a new activity out of a just cleared activity, in the future, use the functionality ‘Follow up Activity’. Using the button opens a second window for scheduling of another activity. All information has been taken over from the initial activity.
Appointments scheduled as activity in here, can be exported into Outlook (the Outlook interface needs to be installed for this function). Therefore use the button . With the button you may synchronize the activities from the Sales Activity Manager and Outlook.
As per button the activity is stored in the listing.
If needed, protel can manage any activity as a ‘Recurring Activity’. This is done in the tab ‘Recurring Settings’ in the dialog box ‘Activity Scheduling'.
Select by tagging the checkboxes, if the activity should be recurring once or more. You may choose from different options.
Example 1: Repeat every second day

Example 2: Repeat every second week on Mondays

Example 3: Repeat every last Friday of the month

Example 4: Repeat the 1st and 2nd of every third month

Then determine until which date the activity is to be recurring. The next recurring activity is automatically created once the initial activity is cleared, until the final date is reached or if the activity has been changed to ‘Once’.
Should you wish to enter all recurring appointments immediately, activate the checkbox Generate recurring appointments immediately.
Modify an activity
From the context menu, choose the Option ‘Modify Activity’. You will find the same dialog box as for a new activity. Edit the activity and confirm with .
To move an activity just use Drag and Drop. Pull the activity while clicking on the mouse to the desired spot in the Sales Activity Manager.
Deleting an activity
To delete an activity you need to tag it, than choose the option ‘Delete Activity’ from the context menu. The entry will be removed from the list.
Viewing a contact
Therefore select the option ‘View Contact …’ from the context menu. The profile sheet of the contact will open up.
Print Account Information
There are two ways of printing in the context menu. You may print the account information for the selected contact or even for all contacts for a given period. This makes especially sense for example during a sales call outside, where one would need access to all information for a specific working day.