 Manager User Administration
System Data Manager User Administration
To be able to work with the user administration in protel HMS, there must be at least one user group with a minimum of one user created that has access to work with this menu item.
Functionalities that can not be used by a certain user group have to be removed in the user administration.
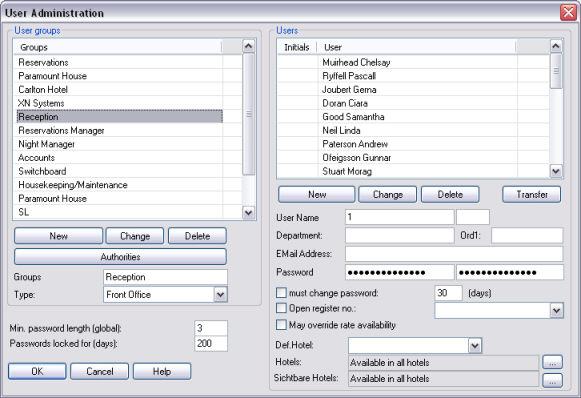
First of all one creates the User groups. Examples for user groups could be: Front Office, Manager, Housekeeper, Trainees etc.
Enter a name for the group and select a group type from the pick up list. As per default, only the type Front Office is created. The additionally offered type "Sales" can only be used by hotels that have installed the protel Sales & Marketing module.
Confirm by clicking on the button to add the entry to the list. Should you wish to edit an already existing group, highlight and modify it, then click on the button to save changes. To remove a group, highlight it and click on .
The newly created user groups have access to all protel functionalities per default. By clicking on the button you open a dialogue box in which you can withdraw access rights and grant them again if you wish.

On the left hand side of the dialogue you see all permitted functionalities and on the right the prohibited functions for the group. You can assign/withdraw rights per Drag and Drop or by clicking on the buttons und . Therefore highlight the rights and click one of the buttons. The buttons and highlight or de-highlight all entries.
You can replace the existing rights of a user group with those of another one. Therefore select the user group whose rights you wish to copy from the pick up box on the bottom right and click then on the button . After assignment of the group rights you can now assign users to the group.
The Users are created in a similar manner than the groups.
Highlight the group to which you would like to assign a new member and enter a name and if needed the initials of the user. The fields “Department”, “Ord1” and “Email address” are as well optional fields. Text codes exist for initials and department of the user to let them appear for example on invoices or confirmations.
Now apply a password for the user and repeat the password in the second field. The password may contain all letters and symbols that can be found on the key board (this includes the empty space key), even caps lock is differentiated. The password should not be too long, as it should not be a handicap for the daily work with protel.
By tagging the checkbox  must change password and entering a corresponding number of days, the user is forced to change his password after expiry of period. If you would like to determine that the user can only post on one particular cash register you can tag the checkbox Open register no. and assign a cash register from the pick up menu.
You can as well by tagging the checkbox May override rate availability, accord the right to the user to conduct reservations against determined rate availability. Users with this access right can view rate codes in the rate availability that are invisible to others.
For MPE installations each user needs to be assigned with a default hotel from the pick up menu.
Now confirm your entries by clicking on to add the name of the user to the list of users. You can edit the name of a user by highlighting and modifying it, enter the password and press A user is removed, if you highlight the name and click on the button .
If you are trying to delete sales staff that still has contacts assigned in the Sales & Marketing module, you can only delete him by clicking the button to transfer contacts and appointments to another sales staff.
You may determine password conditions for all users in this dialogue. Enter a number that represents the minimum password length and determine the period, during which the password is locked.