 Reservationg Allocate Rooms
Room allocation |
Front Office Reservationg Allocate Rooms
|
|
The Allocate Room menu item allows you to assign a room to individual reservations and modify these as required.
If protel is set up so that room type reservations are not automatically assigned a preliminary room number (see below), the room will automatically be allocated when you check in the room type reservation from the arrivals list, for example.
|
|
Click Reservation > Allocate Rooms.

|
Arrival date |
Filter reservations for which you want to perform a room allocation by the date of arrival. Enter the date directly or select it using the button. |
|
|
All rooms are displayed. |
|
|
All unassigned rooms are displayed. |
|
|
Only allocated rooms are displayed. |
|
Name |
Filter the rooms you want to display by a specific name. This can be useful when editing all rooms in one group that must be on the same floor. |
|
Sc/TA /Cm/Gp |
Filter the reservations you want to display by source, group, company or travel agency. |
You can define whether the displayed reservations should be shown by room plan number or room status.
Define the number of reservation statuses to display.
Use the  All/None to select all four status options or no status option.
Once you have filtered the reservations, all reservations that meet the selected criteria will be shown in the left window pane of the Room Allocation dialog box. When you select a reservation, all rooms available for a specific reservation period are shown in the right window pane with their respective room features.
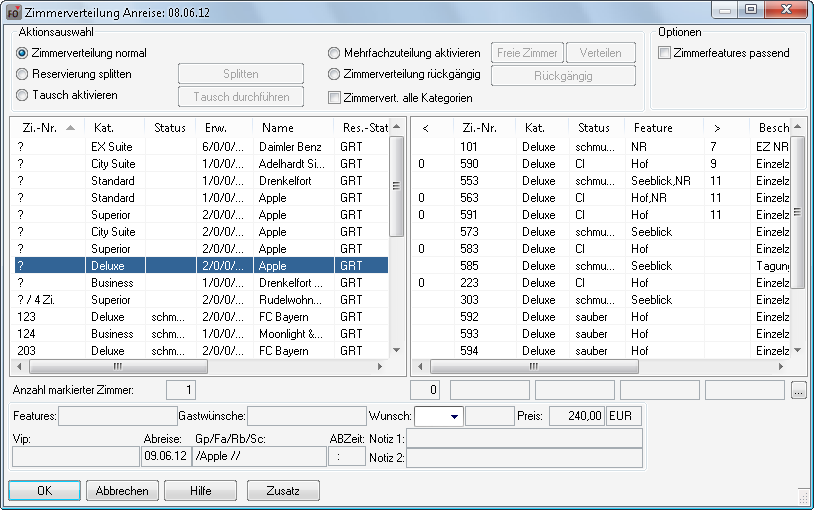
This column displays the following:
a question mark if no room has been assigned
the room number if a room has been assigned
a question mark / the number of rooms (?/4 rooms) if the reservation is for a group and no rooms have been assigned. In this case, the reservation must be split before individual rooms can be assigned (see "Split ting a reservation" below).
The "<" and ">" columns in the right window pane indicate how many days precede or follow the previous or following reservation.
|
|
Some reservations displayed in the results list appear in different colors:
Red: The guest left a comment in the guest profile and/or a VIP code was stored in the guest profile.
Blue: The reservation has been tagged with "Blocked room". A message appears if a different room is assigned.
Right-click the mouse to open the Navigator and edit the reservation as required.
Select one of the following options:
|
|
Rooms will be allocated individually |
|
If the total number of reservations and not the individual rooms ("?/10) for a group or multiple reservations is shown, the reservation must be split before rooms can be allocated. Select the “Split Reservation mode” check box, select the reservation and click the [] button. You will then be asked how many rooms you would like to split. If you want to split the entire reservation, you must enter the total number of rooms. If you only want to split a certain number of rooms, enter the respective number of rooms in the box. |
|
|
|
If you would like to swap rooms for two reservations, select the “Swap rooms mode” check box and select the two reservations whose room numbers should be swapped. Once you have made your selection, click [. |
|
|
You can allocate several rooms simultaneously. Select the check box to select several rooms on the left-hand side. Click the [ button. All available rooms appear on the right-hand side. The number of rooms selected on the left-hand side are automatically tagged. If you want to allocated rooms other than those suggested, change the selection in the left window pane. The “Number of selected rooms” box directly below the lists helps you select an identical number of reservations and rooms. Click to assign the rooms to the reservations. |
|
|
If you need to change a room reservation, select this check box, select the reservation you want to change and click to cancel the assignment. A question mark will automatically appear instead of the room number. |
|
|
Select this check box if you want to display all rooms available during the reservation period. Clear the check box if you only want to display rooms that have an identical category in the right window pane. |
|
|
Select this check box if you only want to display rooms with identical room features, for example if the guest requests a room with a balcony. |
Guest information is shown at the bottom of the dialog box. This information is taken from both the guest profile and the reservation.
If room features have been stored in the guest profile, rooms with these features will appear first in the list during a room search. This requires that the corresponding codes must be entered in the system data (System Data > Reservation > Room Features). Manual entries will not be taken into consideration.
![]()
 An entry in the PROTEL.INI file (in Section "Zplan", "Zimmerplanbezug=1/0") indicates whether or not room type reservations are assigned preliminary room numbers and are consequently displayed in the room plan. If this option is activated, the room numbers assigned to room type reservations will be flagged with a question mark; otherwise, a room number will not be entered. For more information, contact your system partner or protel hotelsoftware GmbH in Germany.
 A "0" in the "<" column indicates that the next reservation directly follows the reservation in question, providing useful occupancy information.
 Room allocation within all roomtypes