Address |
Front Office ![]() Profiles
Profiles ![]() “Address” tab
“Address” tab
|
Contents Hide |
The appearance of the “Address” tab differs depending on whether you are viewing a private or non-private profile:
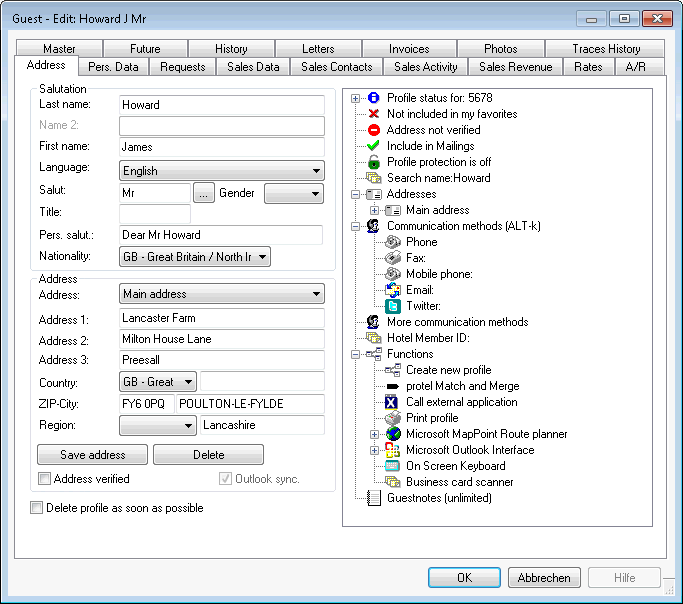
Use the Address tab of a private guest profile to enter all details relating to the address of a private guest. The tree view to the right also displays additional information about the guest.

|
Last name |
The guest's last name. |
|
First name |
The guest's first name. |
|
Language |
Language setting for the guest. This is important to ensure the correct form of address, for wake-up calls (if a telephone system is used), etc. Note: The reservation confirmation is not automatically printed in the guest's language. You should use the system data to create a form for each language as required. When you generate a new text for this guest, only the forms created in the language selected here will be available for selection. |
|
Salut |
Click the button to display a window in which you can select the required salutation, as defined in the system data. The language in which the salutations are displayed is determined by the country code you select in the “Country” box. |
|
Gender |
The guest's gender. |
|
Title |
An academic title. This can be printed in the address (you can also define suitable salutations in the system data as an alternative). |
|
Pers. salut. |
The personal salutation is populated automatically when you select an entry in the “Salut” box. It is used when printing correspondence and can be overwritten if required. The language in which the salutations are displayed is determined by the country code you select in the “Country” box. |
|
Nationality |
Select a nationality based on the list of codes defined in the system data. This information is required for generating monthly nationality statistics for the German Federal Statistical Office. A guest's nationality need not necessarily correspond to the place of residence (country). |
Address |
|
|
Address |
Select the address type. The main address is used for general correspondence. All other address types are stored for information purposes. For instance, the main address of a company could be its PO box address and the second address its office address. The various address types are defined in the system data. |
|
Address 1 |
Enter the street information for the guest's address. |
|
Address 2 / |
Foreign addresses often require the use of a second or third box. |
|
Country |
Select a country from the drop-down list. The available countries are defined in the system data. If the country you are looking for is not in the list, you can enter the name of the country manually in the box to the right. |
|
ZIP |
Enter the ZIP code without a country code. protel “remembers” all cities and ZIP codes that have been entered. Once a ZIP code has been entered together with a city, protel will automatically enter the city it has “learned” once you enter the ZIP code. |
|
City |
The city for the guest's address. |
|
Region |
The region for the guest. This field is usually required only for non-German address formats. |
|
|
If you want to enter a second address, click the [ button to save the address you have already entered. Then select a different address type for the second address (e.g., business address). |
|
|
Delete the entries for an address (pay attention to the address type currently selected: main/business address, etc.). |
Foreign addresses are printed in a range of different formats. protel identifies the correct format automatically based on the country assigned to the address. Since the formats differ from country to country, the input screen contains more boxes than may be required in some countries. Simply leave the boxes blank if they are not required.
Use the right window pane to enter or access additional information about the guest. Click the plus and minus symbols to open and close the directory branches.
|
Profile status for xxxx |
xxxx stands for the sequential number assigned by protel. Beneath this, you can see when the profile was created and by which user. “Changed” shows the day, time, and user for the last change. “Assigned” shows the hotel in which this profile was created (for MPE only).
|
|
|
You can mark a profile as a “Favorite” if you access it on a regular basis or if it is important for some other reason. To do this, click “Not included in my favorites” to change the status to “Yes - Profile belongs to my favorites”:
To access your favorites, proceed as follows: Use the protel Explorer to access all profiles identified as favorites. You can open the Explorer: • Using the “Profiles > My Profiles” menu • Using the “Search profiles” dialog boxes ([My Profiles] button]) • From any list of search results ([My Profiles] button) • By performing a search using the protel “Search & Command Bar.”
|
||
|
Address |
You can use this to display the various address types stored for this profile. |
|
|
Address is verified / not verified (Add-on module) |
The “protel Address Check” add-on ensures that new address details have been entered correctly and in full from the outset – with time-savings of up to 40%. It also automatically checks addresses arriving via online bookings and supplements or corrects them as required. For more information, see the protel website: http://www.protel.net/product/addresscheck/ |
|
|
Mailing status
|
You can use the mailing status to determine whether or not the guest wishes to receive mailings:
|
|
|
Profile protection |
To write-protect a profile, change the entry from “not protected” to “protected”:
Protected profiles can no longer be edited.
|
|
|
Search name |
The search name allows you to assign an identifier in addition to the actual name in order to find the profile more easily (for example: name = Borussia Dortmund GmbH & Co. KGaA, search name = BVB). The name entered is used as the search name by default. To assign your own search name, simply click the “Search name” entry and enter the required term. |
|
|
Addresses |
If multiple addresses have been entered for one profile, click “Addresses” to view all saved entries: |
|
|
Communication methods |
Enter the various contact details, such as telephone, e-mail, fax, etc.:
Click “Communication methods” to access an entry and enter information. To open a single connection type (e.g., only the telephone number), click “Phone” to create the individual item. Proceed in the same way to create an individual fax number, mobile phone number, or e-mail address. You can also define the type of entries using the “Reservation/Guest Profile Codes/Guest Communication Methods” system data.
Click [Show Tweets] at the bottom of the window to connect protel to the specified Twitter account. |
|
|
Hotel Member ID |
Click “Hotel Member ID” to enter a member number and a password. The member ID can be used in the protel Web Booking Engine to allow corporate customers, travel agents, and frequent private guests to register quickly and easily by logging in to the system. In this case, the personal details for the online booking are retrieved from the protel guest profile and do not have to be entered again. |
|
|
AVS registration card |
Available only if an AVS registration card interface has been established. Contact the protel Sales team or your protel distributor for more information. |
|
|
Functions: |
|
|
|
Create new profile |
Saves the entries in the open profile and opens a blank profile. |
|
|
protel Match and Merge |
See the section Guest Profile > protel Match & Merge. |
|
|
Call external application |
Special interface for external applications that can be launched via the profile. |
|
|
Print profile |
Prints the address, communication methods, and comments for this profile. |
|
|
Microsoft MapPoint Route planner |
Calls an external program that provides automated directions. protel currently supports Microsoft MapPoint 2004, 2009 and 2013. Contact the protel Sales team or your protel distributor for more information. |
|
|
Microsoft Outlook Interface |
You can use this option to synchronize addresses and meetings from Outlook with protel and vice versa. Contact the protel Sales team or your protel distributor for more information. |
|
|
On Screen Keyboard |
Opens an on-screen keyboard. You can then use your mouse to make all required entries. |
|
|
Business card scanner |
Available only if a business card scanner interface has been established. This function controls the connected business card scanner. It scans the guest data from the business card and enters it in the correct boxes in the protel guest profile. A separate license is required to use the business card scanner interface. Contact the protel Sales team or your protel distributor for more information. |
|
|
Available user rights |
|
|
132 |
FO Guest profiles - change password |
Controls access to the hotel member ID (FO - Profiles - Address tab - Tree view -+ Hotel Member ID) |
|
817 |
FO Master Profiles (edit) |
Withdrawing right 807 prevents an employee from editing master profiles. |
|
818 |
FO Protected Profiles (edit) |
Authorizes the user to edit a protected guest profile. |
|
851 |
FO Guest profiles: Edit pers. data even when profile is protected |
Allows the user to edit the personal details in a protected profile. |
|
852 |
FO Guest profiles: Edit guest requests even when profile is protected |
Enables the “Requests” tab even if the profile is protected. |
If you select the ![]() Delete profile as son as possible check box, a guest profile will saved in the system only as long as a reference exists to a reservation or accounts receivable entry. The profile is deleted at the end of the month (at the end of the day for SQL) at the latest.
Delete profile as son as possible check box, a guest profile will saved in the system only as long as a reference exists to a reservation or accounts receivable entry. The profile is deleted at the end of the month (at the end of the day for SQL) at the latest.
You should select this check box by default when creating a group master profile, for example, as the profile will no longer be required once the group has checked out.
|
|
Available user rights |
|
|
130 |
FO Mark profile to be deleted |
Enables/disables the “Delete profile as soon as possible” function |
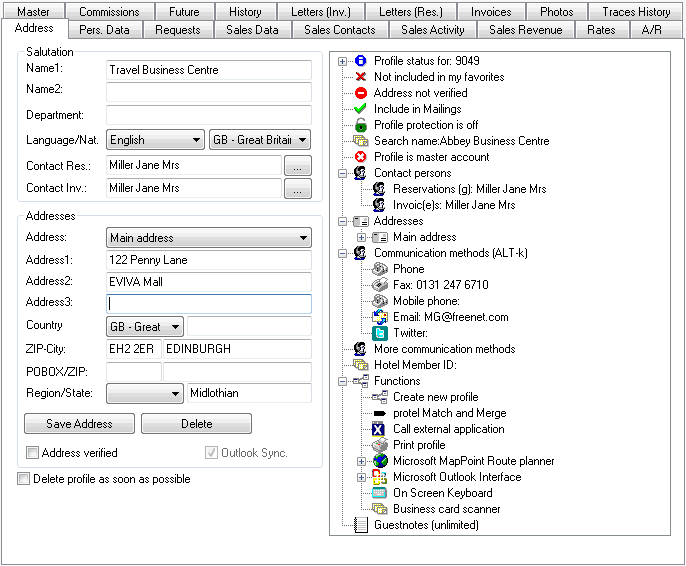
Use this tab to enter all information relating to the address of a company, travel agent, source, or group.

You can enter or access additional information about the company in the right window pane, see the section above: Tree view.