Reports Room Type Plan
Room type plan (F2) |
Front Office Reports Room Type Plan
|
|

You can press the [F2] function key on your keyboard, click the “Room Type Plan” toolbar icon or select Reports Room Type Plan from the menu to open the room type plan.
The room type plan is one of the main work areas in the protel PMS software. You can check availability of all room types at a glance and you can enter reservations or events quickly and easily.
This topic tells you how the room type plan is structured and what kind of information you find here. You will learn how to navigate the visible period period of time, how to switch to another period, how to zoom in and out of the view, how to read the data in the various sections and how to print the current view.
The room type plan provides information for a selectable period of time in table form. It comprises the following sections:


|
|
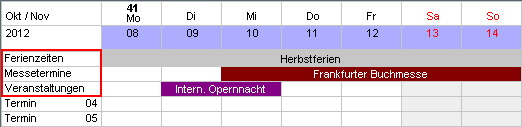
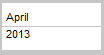
The first column of the table heading indicates the current period of time, which in the example is the month of April 2013. |
|
|
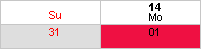
The single date highlighted in color is the current date (Thursday, April 18 in this example). The calendar weeks are numbered (16 in this example) |
|
|
The current month and the one after that is always highlighted in different colors. Weekends are highlighted in a red font. |
You can move the time bar to the left (past) or to the right (future) to view the exact period for which you want to make a reservation, for example. Proceed as follows:
 or backward
  one day at a time.
Click the required month to move the time bar to the first day of that month.
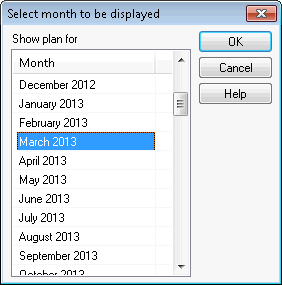
If you need to select a period beyond the visible months, right-click any one of the month tabs to open the “Select month to be displayed” dialog box and make your selection.
 You can define the “resolution” (level of detail) you want to work in. Click the buttons in the top right corner of the dialog box to select a zoom level between one and four.
Note: The greater the zoom level, the shorter the visible period of time.

Use the event area to enter information about events, travel groups or promotions with special rates. You can optionally link an event with a rate code that is automatically suggested for each reservation that is made for the respective period of time. You can define custom names for your events and have them displayed in various colors. (For more information, refer to the “Entering events” section.)
|
|
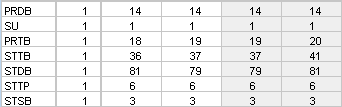
The middle section of the room type plan shows the individual room types along with the number of available rooms per type.
The column next to the room type listing allows you to enter the number of rooms to reserve per room type. The default value is “1” for all room types. You can change the value as required. (For more information, refer to the “Making reservations in the room type plan” section.)
|
|
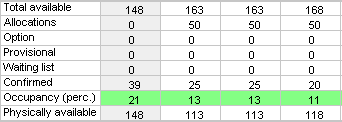
This area provides detailed availability information for every single day:
|
Total available |
All rooms that are still available. This number does not take into account any allocations, optional reservations (see below) or waiting list reservations. |
|
Allocations |
All rooms from allocations that were not defined as “Room type independent allocation.” |
|
Option |
Number of optional reservations that are not deducted from overall availability (tentative or unspecified reservations where arrival is unlikely). |
|
Provisional |
Number or optional reservations that have already been deducted from overall availability (definite bookings). |
|
Waiting list |
Number of all reservations that where entered with a “waiting list” status and are to be confirmed manually. |
|
Confirmed |
Number of all reservations created with a definitive reservation status, including all provisional reservations and all allocations that were defined as “Room type independent allocations.” |
|
Occupancy (perc.) |
Displays highlighted in red, yellow or green depending on the occupancy in percent. |
|
OutOfOrder/Service |
Number of rooms that are flagged as out of order or out of service. A special setting controls whether or not OOS rooms are displayed. |
If you want to print the room type plan, press [Shift] + [D] to open the Windows “Print” dialog box. protel prints the current screen view.
|
|
Available user rights |
|
|
50 |
FO Room Type Plan |
Authorizes the user to access the room type plan. |
|
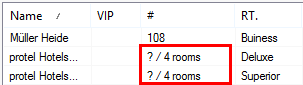
A room type reservation simply reduces the availability of the room type. However, the reservation does not appear in the room plan until a specific room has been assigned and the guest has checked in. Until then, a question mark appears instead of a room number in all lists and reports:
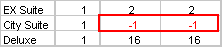
Room type reservations in the room type plan can result in overbookings. If a room type is overbooked, the availability area indicates the number of overbooked rooms in red and with a leading minus (-) sign.:
However, if your installation is configured for automatic room allocation, an available room of the selected type is automatically assigned to the reservation. In this case, the reservation is displayed in the room plan immediately. Use the PROTEL.INI file to adjust the relevant system setting as required. Contact your system administrator for information about which room plan mode is used in your system. |
To create a reservation in the room type plan, proceed as follows:
In the room type area, place the cursor on the required arrival date for the room type you want to book.
Press and hold the left mouse button and drag the mouse pointer to the required departure date.
Click the green check mark 
This opens the “Reservation” dialog box that allows you to make the relevant settings.
For more detailed information, refer to the “Reservation” section.
You can enter several reservations for the same guest or booker but for different periods of time and room types.
Select the respective periods for one or multiple room types:
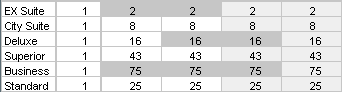 |
Fig.: Selecting the EXSuite, Deluxe and Business room types for various periods of time. |
Follow the above instructions to open the Reservation dialog box. The dialog box lists the details for all reservations. Please note, however, that all reservations must be made on the same name.
If you want to reserve multiple rooms of one type for the same guest/booker, enter the required number of rooms in the column next to the room type codes. The default value is “1” for all room types. Change the value as required.

Select the required period and create the reservation as described both above and in the “Reservation” section.
[Room type plan > Events]
Proceed as follows to create an event:
Open the room type plan.
Select the event row where you want the event to appear.
In that event row, place the cursor on the start date of the event.
Press and hold the left mouse button.
Keep the mouse button down and drag the mouse pointer to the end date.
Release the mouse button.

Press the ENTER key, or right-click the selection and select “Event” from the context menu that appears.
This opens a dialog box in which you can enter the event dates:
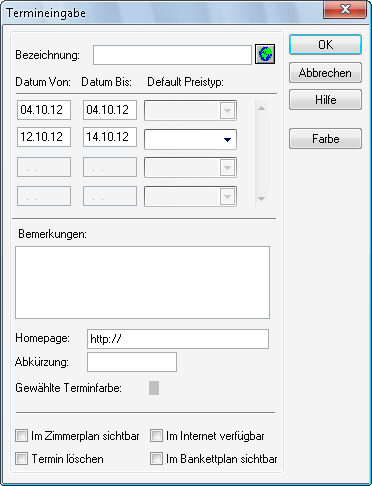
Enter a name for the event. If the event covers several periods of time, you can enter these in the individual rows of dates.
Select a default rate code from the drop-down list if required:
Any new reservations that are entered for the duration of the event automatically default to the rate code you select here. In other words, this setting overrides the default rate code assigned to the room type in the system data.
Use the Remark box to enter free text as required. You can also enter a URL if necessary.
In addition, you can define a color to display the event in the room type plan. 16 colors are available for selection; the default is gray. Click the color box as required to open the color picker dialog box and select a different color.
Additional options:
|
|
Select this check box to have the room plan display the validity period of the event in red. |
|
|
Select this check box to make this event available for booking through the protel Web Booking Engine (if configured). |
|
|
Select this check box and click [ to delete the event. |
|
|
Select this check box to make the event visible in the protel banquet plan (if configured). |
|
TIP: Make a point of entering custom names for events:
protel Support will be happy to configure the relevant settings for you. |
|
|
Available user rights |
|
|
50 |
FO Events |
Authorizes the user to create events. |
|
357 |
FO Events - Homepage |
Controls access to the “Homepage” box (enter/edit an Internet address for an event). |
|
|
Available settings (events) |
|
Special setting for MPE hotels: |
|
In the availability area, click any date cell in the Allocations row to display an overview of the current allocation occupancy. (Refer to Reservation > Maintain Allocations > Allocation Occupancy.)
 As of Version 2014.18.755
For MPE installations, the occupancy overview can now be automatically accessed for the selected property (standard setting - all properties). Please don’t hesitate to contact your protel Support Team to assist you with the settings. Just call us!
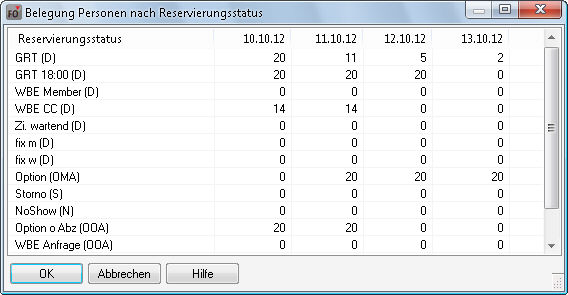
In the availability area, when you click a specific date under option / provisional / waiting list or definitive and enter the number of days, the system opens the occupancy overview by reservation status:
From version 2013.18.067
In this list, you can now also display the group master. Your protel Support Team will gladly make these settings for you. Just get in touch – we’ll be happy to help!
Click the OutOfOrder/Service row in the availability area to display a list of rooms that are blocked on the selected day.
Press [F12] to open the room type plan in view-only mode. The graphical occupancy representation may be particularly helpful: Select the “Graphic” check box in the bottom right of the dialog box to display a graphical representation of room occupancy.
MPE installations allow you to switch the view between various hotels. (This requires the “viewmode_mpe” setting to be active. Contact your protel distributor for more information.)
|
|
Available user rights |
|
|
366 |
FO Roomtype (display mode different hotel) |
Authorizes the user to switch the display mode between various hotels. |


 Visible in room plan
 You can enter custom names for the events in the event area (Event 01, Event 02, Event 03, etc.) to help categorize them, for example: