Guest data

Reservation data

Reservation details
The Reservation dialog box |
|
|
The “Reservation” dialog box is the central location for creating or editing reservations. It provides access to all relevant guest and reservation details. You can change the reservation details with just a few mouse clicks. Any changes you make here are immediately reflected in the occupancy details.
You can access the reservation dialog box in a number of ways:
Using the Search: Use the Reservation search function to access a previously created reservation or click [ in the Search Result dialog box to create a new reservation.
Using the room plan: Right-click the reservation to open the Navigator. Right-click in the Reservation pane of the Navigator (see the “Navigator structure” section).
Using the room type plan (only when creating new reservations): See the “Room Type Plan” section for more details.
The Reservation screen contains a considerable amount of information and is therefore divided into three main sections:
|
Guest data |
|
Reservation data |
|
Reservation details |
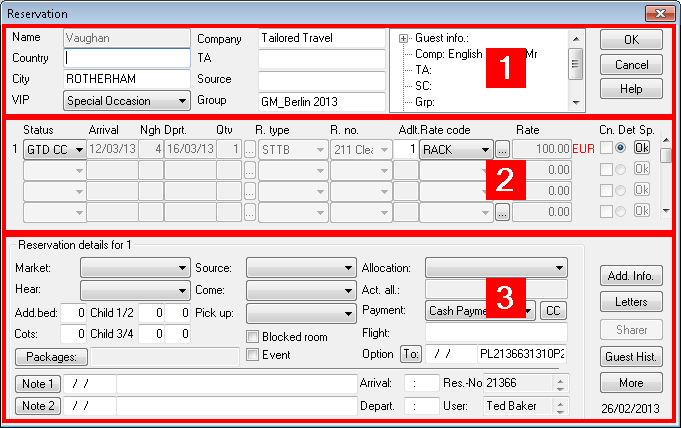
Guest dataThe data transferred from the guest
profile is displayed on the left. The country, city, and VIP status
are all editable.
The guest search function is launched when the name is entered. If
a profile does not yet exist for the entered name, you can create
a new one. For group reservations, the group name is inserted in the
“Name of guest” box.
Enter information about the company, travel agent, source, and/or group in the central column. Revenues and other statistical data generated during the reservation are stored in the guest profile and also in the corresponding company, TA, source, or group profile. For company reservations, the company address is automatically inserted as the invoice address.
|
The tree view on the right displays
additional information from the guest profile:
Double-click the “Guest info.” entry to open additional information,
such as the last rate, last room, and agreed special rates.
Right-click the “Guest info.” entry to open the guest profile. If a
company, travel agent, source, or group is assigned, it will be displayed
here together with the relevant contact persons. Right-click the company
to open the company profile.
Attached
profiles are also displayed here; right-click to open.
An additional name can be stored in the “Booker” box.
Click Send
SMS confirmation letter to send a confirmation text message
(only possible if the “protel SMS
confirmation” add-on is installed). The SMS is sent to the
cell phone number entered in the guest profile for this reservation.
Reservation
data
Enter the reservation data in this pane:
Status |
Reservation status. The reservation status indicates if a booking is optional or definite, for example. The status of a reservation determines the color used to display the reservation in the room plan. |
Arrival |
Arrival date. You can change the arrival date by overwriting it or using the plus and minus buttons. Alternatively, you can right-click the date box to open a calendar in which you can click the required date to select. |
Ngh |
Number of nights. This can be overwritten or changed using the plus/minus buttons. |
Dprt. |
Departure date. This can be overwritten or changed using the plus/minus buttons. Alternatively, you can right-click the date box to open a calendar in which you can click the required date to select. |
Qty |
The number of rooms
to be reserved. Use the |
R. type |
Reserved room type. Select the required room type from the list of room types created in the system data. If the reservation has been entered using the Room Type Plan or Room Plan, these boxes will be populated already. |
R. no. |
Room number of the guest. Not entered for room type reservations. If you click this box, you will only see a list of the rooms available for this room type within the reservation period. |
Adlt. |
Number of adults. This number influences the rate. You can enter the default number for each room type in the system data. |
Rate code |
The underlying rate code group for this reservation. The default rate code that is proposed when creating a new reservation depends on the settings made in the system data (“Reservation > Room Types”). You can select a valid rate code group for the reservation period from the list. |
Rate |
The daily room rate to be posted. You can overwrite this rate. Internal splitting will be performed on the basis of the rate code stored in the system data. If the overwritten rate exceeds the splitting value, the stored splitting table will be ignored and the entire amount will be added to the stored accommodation account. Splitting will also not be performed if the rate is set to 0.00. |
Cn. |
“Connect”: This box indicates whether multiple parts of a reservation are connected to the same reservation (include a move for example). In this case, the arrival and departure dates refer to the length of stay within a particular room. If reference has already been made to the move in the reservation, the reservation can be created as a reservation with move directly. First create partial reservation 1 and then select the [ An information message appears, confirming that both parts have been connected. |
Det |
“Details”: For displaying multiple partial reservations on the Reservation screen. The details shown in the lower part of the screen (number of children, additional beds etc.) are for the reservation for which this radio button has been selected. If, for example, you only want to enter an additional bed for the third reservation, you first have to select this radio button and then add the additional bed in the lower pane. Finally, save the changes to the details and click [OK] |
. |
“Save”: If you have multiple partial reservations and want to transfer the details of the first reservation to another reservation, first connect the reservations (by selecting the If you have created multiple reservations and want to create different details for each reservation, select [OK] to confirm. These details will then be saved for the individual partial reservation. |
Reservation
details
Enter the reservation details in this pane:
Market code |
Market codes are used to collect statistical information about booking and sales trends by market segment. Select the required code from the list created in the system data. |
Source code |
Source codes are used to determine the sources of the reservations (and therefore sales). Select the required code from the list created in the system data. |
Allocation / Act. all. |
If the reservation belongs to an allocation (also referred to as an allotment), you can enter the name of this allocation here. The field"Act. all." displays the currently set allocation. |
Hear / |
In the system data you can define codes that provide information about where the guests heard about your hotel and the reason they chose to come to your hotel. You assign these to the reservation here. |
Add.bed / |
Number of additional beds/cots required. This information can be used to calculate the rate. |
Child 1/2/3/4 |
Number of children 1, 2, 3, 4. This information can be used to calculate the rate. |
Pick up |
If you offer transfers, or simply require information about how the guest is travelling to the hotel (by plane, train), you can assign the relevant pick-up codes stored in the system data to the reservation. |
Payment |
Enter the method of payment that you want to be proposed by default at check out. Select the required method of payment from the list created in the system data. If a CC payment method is entered, the button will be shown automatically. |
button |
Opens the credit card information entry dialog box.
Enter the data here or, if it has been entered in the profile already, click the [ button. Use the [ button to copy the entered data to the profile. If a CC payment method is entered in the Payment box, this dialog box appears automatically. |
You can link different packages to the methods of payment in the system data in accordance with the splitting table. You can then assign these to specific reservations. |
|
|
If you select this checkbox, the room number assigned to the guest is fixed and the reservation cannot be moved. However, User Administration can authorize certain users to do this anyway. The guest name will be displayed in blue in the room plan. |
|
Reservations for which this check box has been selected will be listed in the “Events week plan” report on the date of arrival. |
Flight |
If you are picking up the guest from an airport, you can enter the guest’s flight number here. |
A reservation can be held open as an option until the date entered here. If a specific system setting exists, the date will be entered automatically when this button is selected (see below). After this date has passed, however, the reservation will not be deleted or canceled automatically because this is not generally desirable. At end of day, however, you can print a report, listing all reservations for which an option date has been entered.
|
|
Conf No. |
(After Option To date) This number is calculated internally by protel. This number is useful when searching for the reservation in the reservation list, for example. |
/ |
For entering notes and a date. These notes are displayed on the invoice screen for information purposes, for example. You can also create a list for the date entered. |
Arrival / |
For entering the precise time of arrival and departure for information purposes. protel enters the system time automatically at check in/check out. |
Res.-No. |
Reservation numbers are managed and assigned sequentially for each reservation by protel. Reservations can be opened from the reservation list, for example, by clicking their respective numbers. |
User |
Name of the user who entered this reservation. |
Res.Date |
In the bottom-right of the window: Date the reservation was entered. |
|
Available settings (reservation dialog) |
|
|
|
Available user rights (reservation details) |
|
370 |
FO Reservation: Read CC from profile |
Controls access to the “CC button” > [ function. |
371 |
FO Reservation: Write CC to profile |
Controls access to the “CC button” > [ function. |
903 |
FO Enter/Edit FO reservation confirmation number |
Serves to grant a user the right to modify the confirmation number (PL number) for a reservation in the reservation dialog box. |
Click this button if you need to store additional information about the reservation.
Travel information |
For information about check-in or check-out; embarkation and disembarkation point, for example. |
Laundry |
In this box, you enter the preferred laundry frequency in days (i.e., how often the bed linen is to be changed). The standard laundry frequency is controlled by an entry in the PROTEL.INI file. |
Text box for entering additional information relating to this reservation. |
|
|
Select this check box if you do not want the rate to be printed on registration forms. |
Used member card |
If the guest has one or more member cards, you use this button to assign the card to the reservation. This will either be for a loyalty scheme run by the hotel itself or an airline. In some cases, guests will not decide until their arrival the card for which they want to collect points. In this case, you would select the relevant card here. |
Commission code |
The values entered here are transferred from the guest profile by default. They can be edited if necessary. |
Hotel safe |
For assigning individual safe numbers that are stored in the system data to the reservation. You will receive a message about this at check out. |
Gender |
For assigning the gender of the guest. |
Tax exemption |
For assigning one of the exemption codes stored in the system data (“Bookkeeping > Taxes > Tax Exemption Codes”). Click the [ button to save the exemption code in the profile and assign it automatically at the next reservation for this profile. |
Promotion code Value |
You can also create rate codes of the type “Promotion code” in the system data. These rate codes are only displayed here. |
Discount room rate in p.c. |
Even if no discount code was previously selected, you can store a percentage discount rate here, which will then be deducted from the room rate automatically (internally from accommodation only). |
Discount |
For selecting a discount code that is stored in the system data (“Bookkeeping > Invoice > Discount Codes”). Click the [ button to save the discount code in the profile to be available for future reservations for this profile. |
User values |
Text boxes for entering additional information relating to this reservation. Use the [ button to assign hotel-specific codes to the guest. These codes must have been previously created in the system data. |
|
Assign a specific color to highlight this reservation in the room plan. |
|
You can assign an additional room feature to a room specifically for a reservation. The assignment made here does not affect the system data. |
|
Save special guest requests that relate only to this particular reservation.
If required, reservation-specific guest requests can be shown as "Additional Reservation Data" in the Navigator’s tree view. Ask your protel Support Team to set up your protel system accordingly! We’re happy to help. |
|
Available user rights |
|
196 |
FO Enter/Change reservation discount |
Controls access to the “Add. Info. > Discount” function. |
Click this button to access the Letters tab for the guest, which you use to create new letters for the guest and display or change existing ones.
If the reservation is a company, travel agent, source, or group reservation, an address selection window appears.
You can also create the confirmation here (see the “Navigator > Letters” section).
See the “Sharer reservation” section
Click this button to view all previous reservations for this guest. See the “Profiles, History tab” section
See the “Navigator, More...button” section.
A number of keyboard shortcuts can be used to speed up data entry within the Reservation dialog box.

Use the tab key to go to the next box.
 + [letter]
An even more direct route to the required boxes is to choose ALT + underlined letter. These letters have been highlighted in the following screenshot:
You can use the [+] and [-] buttons to change the arrival and departure dates. It is often quicker to do this than to enter a new date. Alternatively, you can double-click the box directly and enter a date in six-figure format (e.g. “101012” for October 10, 2012).
![]()

 button to change the number of rooms (group/company
reservations etc. only).
button to change the number of rooms (group/company
reservations etc. only).