Reservation Maintain Allocations
Maintain Allocations |
Front Office Reservation Maintain Allocations
|
|
An allocation is a contractually guaranteed number of rooms that a contractual partner (a tour operator, for example) can block out and book for a specific contractual period. Any unused capacities can be returned to the hotel without a cancellation fee under observance of a contractually agreed time limit (this is referred to as dynamic or relative allocation). Once the contractual period comes to an end (closing date), the allocation expires, meaning that any unbooked rooms from the allocation will once again be released for general bookings.
Within protel, there are two types of allocation: , which involves blocking out a set number of rooms for a dedicated tour operator up to an agreed date.
, which involves blocking out a set number of rooms for a tour operator over a longer period, for example from June 1, 2012 until December 31, 2012. With this option, the tour operator is able to return blocked rooms up to an agreed expiration date (a defined number of days before the scheduled arrival date).
Allocations are shown only only on the room type plan, not the actual room plan. Actual reservations from an allocation, however, are indicated on the room plan; in this case, the guest name will be displayed in pink.
There are two types of allocation:
Decrease availability: In this case, the rooms from the allocation (in the respective room types) are generally removed from availability irrespective of whether or not any reservations have actually been made from this allocation. These allocations will not be included in the allocation row of the room type plan.
Do not decrease availability: The rooms are not removed from availability. Instead, the accumulated total of rooms for all allocations are displayed in the allocation row of the room type plan. Reservations from these allocations are removed directly from availability, but are no longer shown in the allocations. This ensures that the precise number of available rooms can be calculated.
Allocations are only ever shown on the room type plan. For allocations of the type Do not decrease availability, the rooms will be shown in the “Allocation” row; for allocations of the type Decrease availability, the rooms will be removed from availability directly.
We recommend the use of Do not decrease availability allocations.
Since an allocation is not a confirmed reservation, allocations are not included in forecasts, such as the hotel status report or other reports.
|
|
Available user rights |
|
|
335 |
FO Maintain allocations |
Controls access to allocation maintenance. |
Click Reservation > Maintain Allocations to open allocation maintenance.
You use the “Maintain Allocations” dialog box to create ( button), edit ( button), or delete ( button) allocations. Click the [ button for a detailed list of all the actions that have been performed in association with the selected allocation. Click the [ button to open budget management for a selected allocation, where you can define monthly values for the allocation.
Double-click an allocation to open and edit it.
Display options:
|
|
All not yet expired allocations are displayed by default. If you also want to display expired allocations, click the “Incl. expired” check box. |
|
|
If you also want to display canceled allocations, click the “Incl.canceled” check box. |
|
|
Available user rights |
|
|
224 |
FO Event modification |
Controls rights to create and delete allocations. |
|
397 |
FO Delete allotment |
Controls access to the [Delete] button. |
Click [Insert] to create a new allocation.
|
Allocation name / Abbreviation |
Enter a name and abbreviation for the allocation. These entries are mandatory. |
|
|
Enter the name of the reservation office (Source), travel agent, group, and / or company for which you want to create the allocation. Enter the first letters or full names in the respective box and click the adjacent button. This opens the corresponding profile, provided this has been created. Otherwise, you can create a new profile. You must complete one of the four boxes at least. |
|
Provision |
The “Provision” box is an information box in which you can enter the commission percentage. However, please note that this is not linked to commission clearing. This entry is optional. |
|
Rate code |
If a special rate code is to be assigned for all reservations of a particular allocation, select it from this drop-down list. Use the button to create a new rate code. This opens the system data “Rate Management” window. This entry is optional. |
|
Date (from / to...) |
Enter the contractual (validity) period for the allocation. |
|
Release date |
|
|
|
|
|
|
In this box, you can enter the revenue you want to be achieved for each adult. This is for information purposes only and will, at most, be displayed on the allocation reports. |
|
Booker, Int/Ext |
The “Booker” and “Int/Ext” boxes are populated by the system automatically. |
|
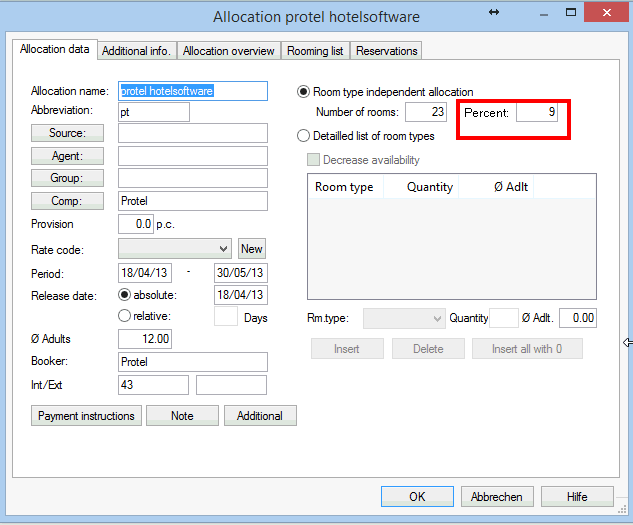
|
If you only need to define a specific number of rooms for the allocation, irrespective of whether these are single or double rooms, select the “Room type independent allocation” check box and enter the number of rooms. The number can also be entered percentage-wise. The number of rooms will be calculated based on the entered percentage value and immediately displayed in the Number of rooms field These reservations cannot be created as “Decrease availability”. |
|
|
If you want to specify a precise number of rooms to be available of each room type for the allocation, select the “Detailled list of room types” check box and enter the required room types (see below). |
|
|
If you want the rooms specified in the detailed list to be removed from room type plan availability, select the “Decrease availability” check box. |
|
|
Select the required room type. |
|
|
Enter the number of rooms for each room type. You can also specify the average number of adults to be expected per room (optional). |
|
|
Click the [ button to add the entry to the list. |
|
|
Click the [ button to remove entries from the list. |
|
|
Adds all of the hotel’s room types to the list at once with a “Quantity” of 0. Double-click the required room type to select and enter the required quantity. Go through each room type in turn. If you do not require a room type, simply click [Delete] to remove it from the list. |
You can create a group master for the allocation. In this case, you can use the [ button to create a collective invoice for all reservations from the allocation. (see the “More button – Payment/routing instructions” section).
If you need to enter additional information about the allocation, click the [ button.
[Reservations > Maintain Allocation > Edit allocation / Additional info.]
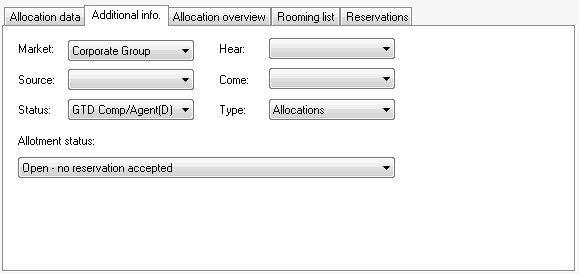
|
|
If necessary, store a market or source code for the allocation, ‘hear’ and ‘come’ information (where they heard about the hotel and the reason they chose it), and a reservation status.
Every reservation that is created from this allocation will be assigned the features defined here automatically.
“Open”: The number of rooms within the allocation can be changed as required for the allocation period.
|
|
“Closed”: If the allocation is closed, a snapshot will be created of the rooms posted at this time. To display this original data, you then need to right-click “Display original number” in the “Allocation overview” tab.
|
|
[Reservations > Maintain Allocation > Edit allocation / Allocation overview]
You can increase or reduce the number of available rooms for a specific period or specific days. You do this in the Allocation overview.
The “Total” column shows how many rooms have been blocked out for the allocation on that day, how many of these are occupied, and how many are still vacant (Quantity/occupied/Vacant).
As of protel version 2018.20.172 (23 November 2018), features of the Allocation overview table have been improved:
For those days on which the allotment has already expired, the values for available rooms are set to “0”.
Days on which the allotment has already expired are grayed out.
|
|
From the list, select one or more dates for which you want to make changes. |
|
|
|
Select the check boxes adjacent to the days for which you want to make changes for a particular period (From.../to...). |
|
|
Room type |
Select the room type for which you want to make changes:
|
|
|
|
Select the
|
|
|
|
Check this box to alter the dynamic expiration deadline for the rooms selected (number of days before the arrival date that the rooms can be released for general bookings). |
|
|
|
Click the [ button to transfer the changes and display these in the overview. |
|
NOTE:
|
The Allocation overview has two context menus featuring a number of useful functions.
Context menu 1
Click any column header in the overview to open the following context menu:
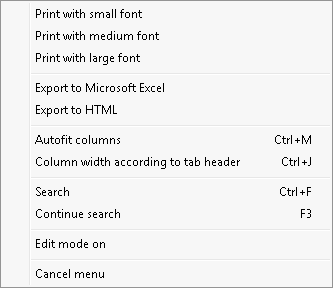
From this context menu, you can:
Print the allocation overview in various font sizes (small/medium/large):
If you want to print the entire list, make sure that none of the rows are selected.
Select a row in the table, then open the context menu and choose Print with small font, Print with medium font, or Print with large font to print only this row.
Export the Allocation overview to an Excel or HTML file
Adjust the column width in the overview
Search in the overview
Activate edit mode (“Edit mode on”):
To edit the allocation quantity directly in the “Allocation overview” dialog box, select “Edit mode on” from the context menu. You can then click a quantity directly in the overview and make the necessary changes. To go to the next box, press the [TAB] key, the right arrow, the left arrow, or the ENTER key. The newly entered values will be changed directly. To recalculate the totals for each day, you will need to press <F5> (Refresh).
Context menu 2
Right-click anywhere within the table to open the following context menu:

From this context menu, you can:
Create and print out the “Allocation occupancy” report
Create and print out a clear allocation occupancy chart
Create a new allocation reservation:
First select the room type required in the lower part of the dialog box. Then select the day required, open the context menu, and click “New reservation”. You can then enter all additional information, such as number of rooms and so on directly in the “Reservation” dialog box.
Choose between different display options
Display original number:
- Shows the original data of the “snapshot” (see above: Additional info. / Storing the allotment (allocation) status).
[Reservations > Maintain Allocation > Edit allocation / Rooming list]

Use the “Rooming list” tab page to make reservations for an allocation.
|
|
Enter the name of the guest (or first letters of the name) and click the adjacent button to open the guest search or create a new guest profile.
 .
.For sharer reservations, you first have to create the sharer, then click  to transfer this. Then follow the procedure described above.
|
|
Available Settings |
|
When adding a guest profile with special rates agreements to the room list of an allocation, you can set that the relevant special rate code will be pre-selected. By default, the special rate code has to be selected by hand. |
|
[Reservations > Maintain Allocation > Edit allocation / Reservations]

The “Reservations” tab shows all reservations that have been made from the allocation. The list that opens provides an overview of the occupancy status. Right-click the individual reservations to open the Navigator for these reservations.
Click the [ button to print the reservations list.
You can make reservations for an allocation in the same way as a ‘normal’ reservation. Select the period in the room type plan or room plan, then go to the “Reservation” dialog box to select and allocate the allocation you require from the “Allocation” drop-down list.

The guest name will always be shown in pink in the room plan:

The reservation is automatically assigned with the allocation profiles (source, travel agent, group, and/or company). Created rate codes and payment instructions are also transferred.
From the room type plan, left-click a specific date in the allocation row to open the following overview.
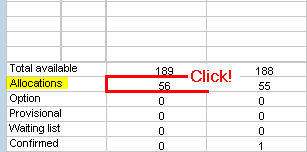
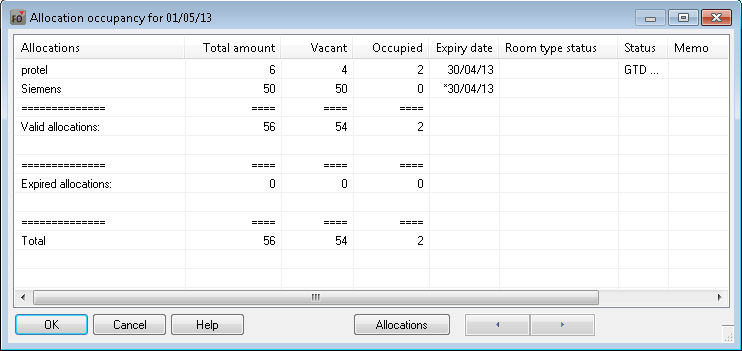
The occupancy overview indicates the current bookings status for the allocations entered for a selected date. Use the arrow buttons at the bottom of the window to go to the next or previous days.
Right-click an allocation to open the Allocation overview for the selected allocation (see above). The “Expiry date” indicates the date from which postings can no longer be made for the allocation.
Click the button to open a window showing all the allocations by room type.
Select the  check box for details of the room type and allocation. The allocation will then be broken down by individual room types.
|
|
Available user rights |
|
|
221 |
FO Overbook allotment |
Authorizes the user to overbook allocations (allotments) |
![]()


 absolute
 Decrease availability


 A special setting must be made in protel in order for the “Additional info.” tab to be shown. For more information, please contact your protel distributor or the
  Please note: If there are any allocations that are still open, but not available for reservations, you will need to make a special setting. Please contact your local protel distributor or the protel support team for assistance.