 Reports
  Room plan
Room plan (F3) |
Front Office  Reports
  Room plan
|
|

The room plan is one of the most essential tools in protel HMS. It enables you to quickly book rooms for single guests or entire groups, change reservations, and gain direct access to all required guest data. The room plan even makes it easy to move a guest to a different room: simply move the guest to the new accommodation and protel will automatically update the associated details, such as the room status, invoicing, and availability.
|
|
Available user rights |
|
|
59 |
FO Room plan |
Authorizes the user to access the room plan. |
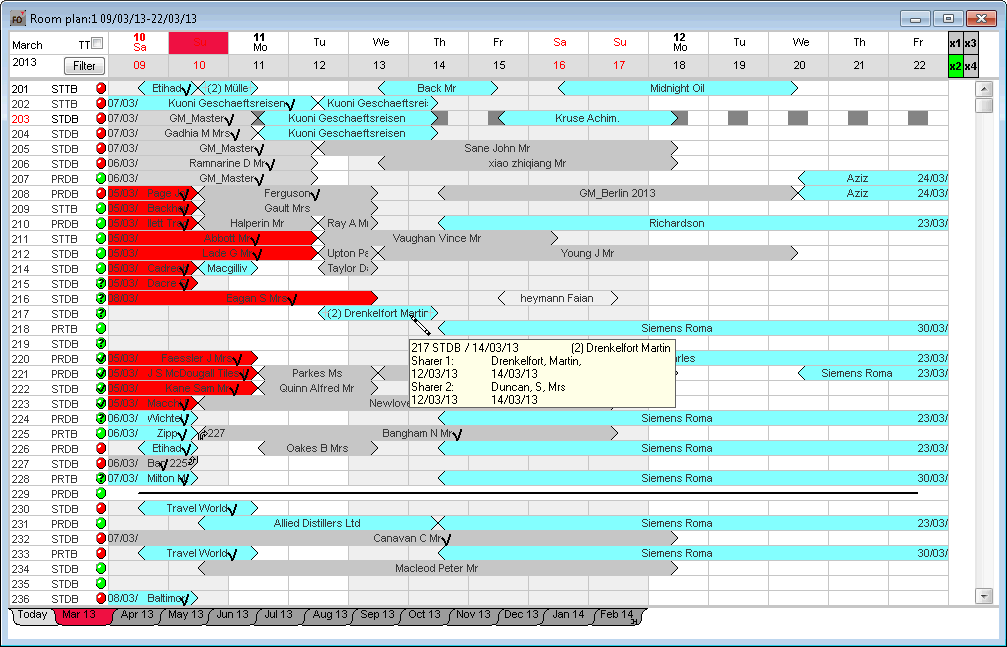
The room plan comprises various sections:

The first column indicates the current period of time, which in the example is the month of June 2012. The subsequent columns indicate the days of the week with the current day being highlighted in color. The number above the day of the week indicates the calendar week (10 and 11 in the sample illustration).
TT  : Enables the tooltips: When you hover your mouse pointer over a reservation, the system shows additional information on the reservation. The settings in the PROTEL.INI file determine what information is shown.
[Filter] The room plan initially opens to show all rooms and room types by default. If, for example, you only want to view all single rooms that have a status of “checked,” you can easily filter for these criteria. (For more information, refer to the “Room plan filter” section below.)
You can move the time bar to the left (past) or to the right (future) to view the exact period for which you want to make a reservation, for example. Proceed as follows:
 or backward
  one day at a time.
Click the required month to move the time bar to the first day of that month.
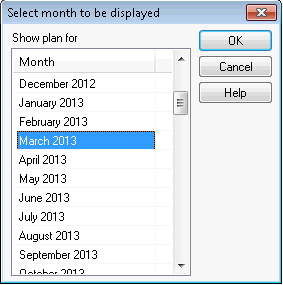
If you need to select a period beyond the visible months, right-click any one of the month tabs to open the “Select month to be displayed” dialog box and make your selection.
 You can define the “resolution” (level of detail) you want to work in. Click the buttons in the top right corner of the dialog box to select a zoom level between one and four.
Note: The greater the zoom level, the shorter the visible period of time.
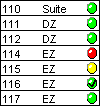
The room numbers are displayed on the left, next to the corresponding room type codes.
The colored dot next to the room type code indicates the status of the room.
The status colors have the following meaning:
|
|
(green dot) |
: cleaned |
|
|
(green dot) |
: dirty |
|
|
(red dot and red room number) |
: out of service |
|
|
(green dot with tick mark) |
: checked |
|
|
(green dot with question mark) |
: touched |
|
|
(yellow dot) |
: cleaning in progress |
|
Available settings (room plan) |
|
|
If requested, it is possible to display room features in the Tooltip of the room (this setting is made using the protel INI)
If requested, free and clean rooms can receive the status “dirty” after a defined number of days (this way, even if the rooms have been vacant for a while, they will regularly be checked and cleaned if necessary).
|
|
Use the filter to select which rooms you want to view in the room plan.
In the room plan, click the [Filter] button on the top left.
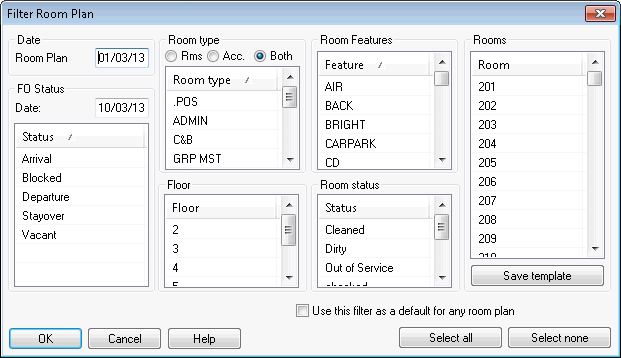
You can filter the view by FO status, room type, floor, room features, room or reservation status or select individual rooms for display. You can use the [ and [ buttons to quickly select or deselect all options listed.
Select the  Rms radio button under “Room type” to only display physical (“real”) rooms. If you select
  Acc. or
  Both instead, the room plan also shows internal hotel accounts and group masters.
Select the  Use this filter as a default for any room plan check box to save the settings and automatically re-use them the next time you access the room plan. You can also click the [
Click [ to confirm the settings and update the room plan view based on the current filter criteria.
The room plan shows reservations in different colors. The color assignments are fixed.
The bar colors have the following meaning:
|
|
(gray): |
Individual reservation |
|
|
(green): |
Group reservation |
|
|
(white): |
Provisional reservation |
|
|
(yellow): |
Room type reservation (only if room allocation is active) |
|
The font colors have the following meaning: |
||
|
|
(blue): |
Fixed reservation (the |
|
|
(pink): |
Reservation is part of an allocation |
|
|
(red): |
Reservation was flagged for editing |
Click a room in the room plan to display any system data information that is available for the room:
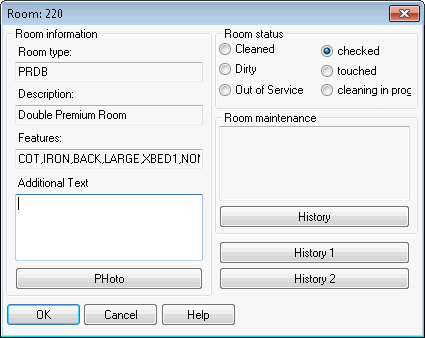
In addition, you can enter additional information for the room (e.g. “TV defective” etc.).
The top right section shows the room status. If you want to change the status, select the relevant radio button.
The “Room maintenance” box shows any Room maintenance tasks that have not been completed.
Click the [ button to access the room maintenance overview from housekeeping.
Click the [ button to open an overview of all transactions made for this room (who made a reservation and when, what charges were posted to this room etc.).
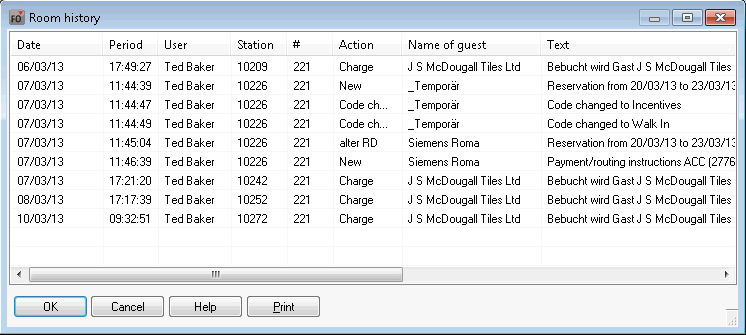
The [ button opens a window that prompts you for a period of time. The dialog box that appears once you select a period provides an overview of all reservations made for this room.
Right-click a room in the room plan to open a context menu with options that are similar to the room information dialog box:
 3
3
|
|
Available user rights |
|
|
360 |
FO Room reservation history |
Authorizes the user to access the room reservation history. |
|
361 |
FO Room transaction history |
Authorizes the user to access the room transaction history. |
Select a room from the room plan.
Place the mouse pointer on the arrival date.
Press and hold the left mouse button.
Keep the mouse button down and drag the mouse pointer to the departure date.
Then release the mouse button.
The screen shows a gray bar:
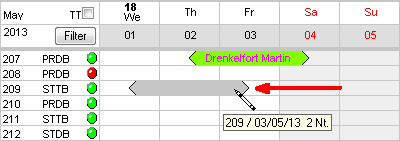 |
Fig.: |
Then
a) press the ENTER key, or
b) click the  icon from the toolbar, or
c) right-click the gray bar and select “Reservation” from the context menu.
In the Reservation dialog box that appears, enter the name of the guest or booker.
Click [ to display the reservation in the room plan. Exception: The room plan does not display reservations that have a “Provisional” status.
You can enter several reservations for the same guest but for different periods of time and room types.
Follow the above instructions to select various periods of time and room types and open then Reservation dialog box. Note that the details for the individual reservations are listed separately. All reservations must be made on the same name.
If a guest wants to check in without a reservation, you can use the room plan to create an ad-hoc reservation and check in the guest immediately.
Create a reservation as usual and right-click the gray reservation bar. Select the “Walk In” menu item from the context menu that appears. This opens the Reservation dialog box. Enter the relevant data and click OK to confirm and check in the guest immediately. If you select “Walk In/register report,” the system checks in the guest upon confirmation and prints a registration form.
You can enter a registration that involves a room move directly in the room plan.
Select the relevant periods for both rooms in the room plan. Make sure that the departure date for the first reservation coincides with the arrival date for the second reservation:
|
|
Fig.: |
Press <Enter> to open the Reservation dialog box. The details for both reservations are listed.
Select the  Cn (=connect) check box to link the two reservations. Click [ to confirm.

The room plan displays both segments as one reservation that involves a move:

The room plan provides multiple check-in options:
the check-in icon 