 Cash Register Invoice
Invoices |
Front Office Cash Register Invoice
You use the Cash Register > Invoice menu item to access invoices directly. This prevents the need to open the room plan or Navigator first in order to view the invoice for a particular reservation.
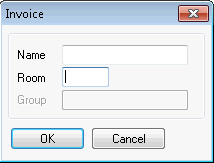
Enter the name or the room number in the Invoice dialog box to open the relevant reservation directly.
If a cash register is not yet active, the system displays the “Open Cash Register” window, which you use to enter the required cash register number and password (a password is only required if one has been created in the system data). If the “Open Cash Register” window does not appear, this means that a cash register is already open. The cash register name is displayed in the status bar of the main protel window.
|
NOTE:
|
Up to six different invoices (A - F) can exist for one reservation, each of which can have a different invoicing address and payment agreement (“More - Payment/Routing instructions” button). If the six invoices are insufficient, you can also create pseudo accounts for the guest, company, or group.
As an alternative to using the “Cash Register > Invoice” menu items, you can also open the relevant guest invoice using the Navigator (right-click in the invoice area) or by selecting a reservation in the room plan and clicking the CO icon (Check Out) in the toolbar.
|
|
Available user rights |
|
|
60 |
FO Bill / Invoice |
Controls access to the “Cash Register > Invoice” menu item. |
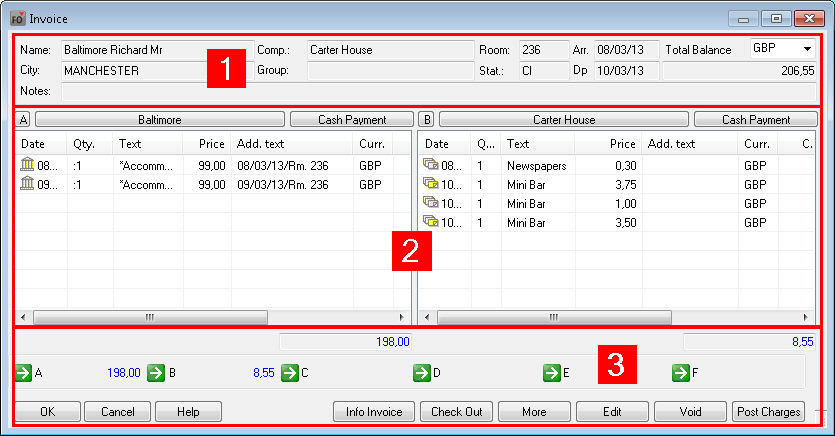
The Invoice dialog box is divided into three sections:
 |
The upper part shows information about the guest and the total balance. |
 |
The central part shows the partial invoice windows. |
 |
The bottom part provides a summary of the individual balances and contains the buttons for editing the invoices. |
Guest informationThe data shown in this area cannot be edited. It shows the room and the guest to which the charges incurred have been posted. This area also shows the reservation status (CI/CO/RES etc.). If the guest belongs to a company or group, the company or group name is shown accordingly. For group reservations, the “Room” box shows the group account number.
Partial invoice window
Two partial invoice windows are displayed in the Invoice dialog box by default, with each partial window representing a separate partial invoice. If only one invoice exists for a guest, the second partial invoice window remains blank. In order to retain a clear overview, a maximum of three partial invoice windows are displayed simultaneously.
Each partial invoice window shows the associated individual postings.

 Version 2014.18.401 | Inv.date: Date of invoice (when had the invoice been created?). If you do not require this information, you can use a special system setting to hide it.
A “ : ” (colon) in front of the quantity indicates that the posting is a package. The printed invoice will also show a “ + ” sign in front of the posting text if the charge has been transferred from a different room.
A “ * ” in front of the posting text indicates that the posting is a fixed charge (i.e., a charge that was posted automatically at the end of the day).
|
|
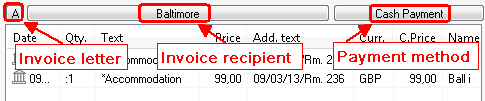
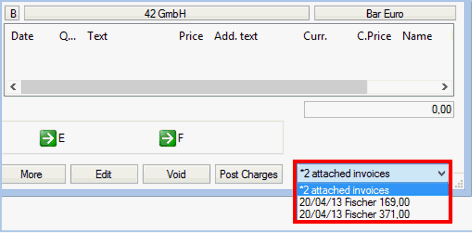
Each partial invoice window is identified using a letter (A - F), and also shows the name of the invoice recipient and the agreed payment method.
Click the letter associated with an invoice to select all invoice items, which allows you to edit them as a group using the context menu (see below). To select individual invoice items, simply click them with your mouse.
If you click the button for the , the system displays the associated guest profile. If an additional invoicing address has not yet been entered for a partial invoice, clicking the blank button starts a guest search so that you can assign the relevant address.
Click the (e.g., cash, euro) to open the “Payment/Routing instructions” dialog box. In this dialog box, you can define payment/routing instructions and change the invoice recipient or payment method.
The associated balances are displayed directly below the partial invoice window.
Balance information and buttonsThe bottom window pane shows the balances for the individual partial invoices (A - F) next to the green arrow buttons. If “0.00” is displayed in this box, the invoice has either been settled, has not been created, or no charges have yet been posted.
Additional control elements appear in the bottom section of the Invoice dialog box if more than two invoices have been created for one reservation:
|
|
Select the |
|
|
Click the [<] and [>] arrow buttons to scroll backward and forward between invoices. |
Right-click an invoice item in the partial invoice window to open the context menu. This menu offers a wide range of options, especially if you are working with packages.
|
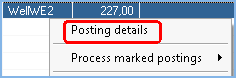
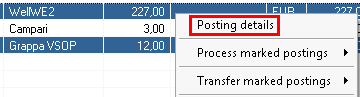
Posting details |
If you open the posting details for a standard charge, the system displays the “Posting details” window (for more information, see the “Posting details for a charge” section). If the posting is for a package (indicated by a colon “ : ” in front of the quantity), the “Package/Split” window opens instead. |
||||||||||
|
Process marked postings |
Opens a sub-menu for voiding the selected posting(s). You can also create a new package from the selected postings. You cannot, however, create new packages from package and payment method postings.
|
||||||||||
|
Transfer marked postings |
|
||||||||||
|
Transfer all items to new invoice |
Transfers quickly and easily all of a guest’s postings to a separate invoice which has its own invoice number. protel creates a non-guest (passerby) invoice for the same invoice recipient, which can be managed and executed separately. The selection box at the lower right of the window enables you to comfortably have access to all of the invoices having been created this way
|
||||||||||
|
Discount |
Use this item to calculate and post the discount specified using a discount code in a guest profile before the guest checks out. No further discount calculations can be performed once a discount has been posted. You can, however, use “Reset discount calculation” to re-enable this option and post the discount again. The first discount posting is retained. |
||||||||||
|
Voucher use |
Appears only if a discount module has been activated. The value of the voucher is credited against the invoice. |
||||||||||
|
More.. |
Opens the More... dialog box. |
||||||||||
|
Edit... |
Opens the Edit invoice dialog box to post an advance payment, etc. |
||||||||||
|
Check Out |
Opens the Check Out window. (See "Interim invoice / Advanced Invoice / Preliminary departure"). |
||||||||||
|
Info Invoice |
Prints an information invoice. |
||||||||||
|
Post |
Opens the Post Charges dialog box. |
||||||||||
|
Calculator |
Opens the standard Windows calculator. |
||||||||||
|
Retranslate items |
If transaction accounts exist in different languages and if the guest's language is changed during his or her stay, this can result in charges appearing on the invoice in different languages (e.g., English and German). To display all postings in one language, select the German postings and use this function to translate them into the language entered in the guest profile. |
|
|
Available user rights |
|
|
125 |
FO Posting details |
Controls access to the “Posting details” menu item in the context menu for the partial invoice window. |
|
139 |
FO Summarize charges to package |
Controls access to the “Process marked postings > Summarize to package” menu item in the context menu for the partial invoice window. |
|
181 |
FO Post taxes |
Controls access to the “Process marked postings > Post taxes” menu item in the context menu for the partial invoice window. |
|
157 |
FO Post discount |
Controls access to the “Discount > Post discount” menu item in the context menu for the partial invoice window. |
|
154 |
FO Retranslate invoice |
Controls access to the “Retranslate items” menu item in the context menu for the partial invoice window. |
[Invoice dialog box Partial invoice window]
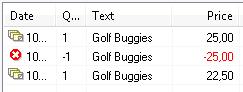
Open the Invoice dialog box for the relevant guest and find the posted item in the relevant partial invoice window.
Select the posting to be voided (individual or multiple selection), right-click, and select the “Process marked postings” option from the context menu. Then select the “Void” option.

The postings are voided, i.e., negative counter-postings are performed automatically.
When you void a payment method, both the positive and negative postings are retained in the cash register. If a payment method is of the type “Accounts receivable” or “Credit card,” the counter-posting is also transferred to accounts receivable management.
You can also void postings manually: Use the [ button to enter a negative value for the quantity or amount and click [ to confirm. Ensure that you specify the transaction account that you want to void.
|
|
|
|
Available user rights |
|
|
90 |
FO Void charges |
Controls access to the “Process marked postings > Void” menu item in the context menu for the partial invoice window. |
|
141 |
FO Void charges without reason |
The “Please enter reason for void” window appears when you void a charge. |
[Invoice dialog box Partial payment window]
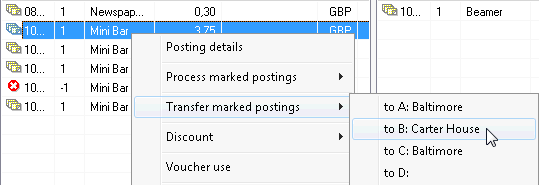
Open the Invoice dialog box for the relevant guest and find the posted item that you want to transfer in the relevant partial invoice window.
To transfer a posting to a different detailed invoice, select the relevant posting(s) and drag them to a different partial invoice.
You can also transfer a selected posting by clicking the green arrow buttons at the bottom of the Invoice dialog box:
Select the relevant invoice item in the partial invoice window and then click the green arrow button for the target invoice, e.g.:  .
.
You can also open the context menu and use the “Transfer marked postings” option to transfer a selected charge.
[Invoice dialog box Partial payment window]
To open a third invoice for a reservation, select the relevant postings in the Invoice dialog box for the reservation and simply drag the selected posting(s) to one of the green arrow keys, e.g.,  .
.
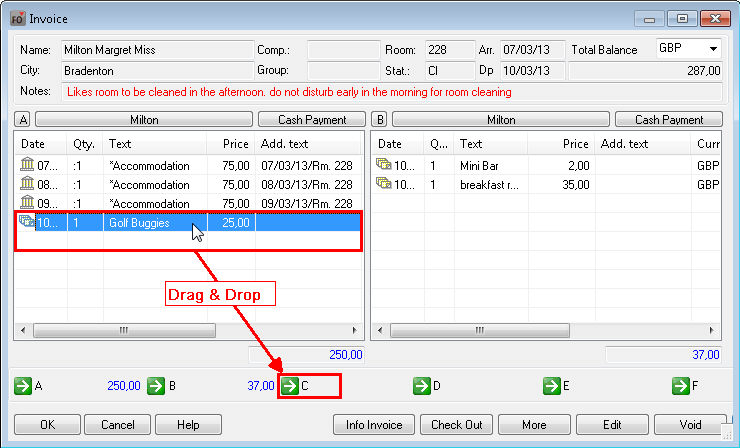
The system will then automatically create a new partial invoice.
To open the posting details, right-click the charge to open the context menu and select “Posting details.”

Use the right window pane to change posting texts and amounts and split postings. You can only change amounts on the day they are posted. You can, however, change the text after the day on which it was posted.
Three buttons that offer the following functions are available on the right:
|
|
Voids the posting. This creates a negative posting that appears on the invoice. |
|
|
Changes the posting text to match the text entered. |
|
|
There are two ways to split an existing posting in two: by splitting the amount or the quantity. Change the relevant quantity and then click the [ button. An additional posting appears on the invoice and the original posting is changed accordingly. Payment postings can only be split based on their amount. You must be logged in to the cash register used to post the payment. Since performing a split does not change the charges that have been posted, you can also split old postings. Examples: Posting: 17 telephone units at €70. You want to split 10 units from the total (e.g., to post them to a different invoice): Change the quantity and overwrite the 17 units with 10. Click [Split] to create two telephone postings on the invoice: one for 10 telephone units and one for 7 units. Posting: Double room at €220, of which €100 is to be split off (e.g., because this is the single room rate and the company only covers the amount for a single room): Change the price by overwriting the €220 with €100. Click [Split] to create two accommodation postings on the invoice: one for €100 and one for €120. If necessary, you can also change text to “single room.” |
Overwrite the price in the Price box and click [OK].
The system performs a reverse posting for the original item and posts the article again at the new price:
 For articles that have been posted multiple times (quantity > 1), the changed price always relates to the individual price of the article.
|
|
Available user rights |
|
|
823 |
FO Charges: Change posting text |
Controls access to the “Change text” function in the posting details. |
|
824 |
FO Change additional billing text |
Controls access to the “Change text > Change additional text” function in the posting details. |
[Invoice dialog box Partial payment window]
Packages are containers that include multiple charges (transaction accounts).
You can post a package in two different ways:
When posting a rate code, as this contains or could contain the accommodation charges and other charges such as breakfast, half board, etc.
When posing packages created using transaction accounts.
Example: An tennis package costs €48 and comprises the following transaction accounts:
€15 – tennis court hire
€28 – personal instructor
€5 – isotonic drink
This package can be posted in the same way as a transaction account and is therefore different than a rate code, which can be posted only as part of the end-of-day routine or using the “Manual room posting” function.
Right-click the relevant booking to open the “Packages/Split” dialog box.

The top pane (“Package name”) shows the name of the package and any additional text. The text entered here is printed on the invoice. You can overwrite the text if necessary. Click the [ button to save changes to the text.
The left window pane shows the charges included in the package together with their individual prices. Right-click a change to open the posting details and edit the individual charge.
[Transfer from invoice] button: Adds the selected charges to the current package. The individual charges are removed from the invoice charges (i.e., no longer displayed/printed) and the price of the package increases accordingly.
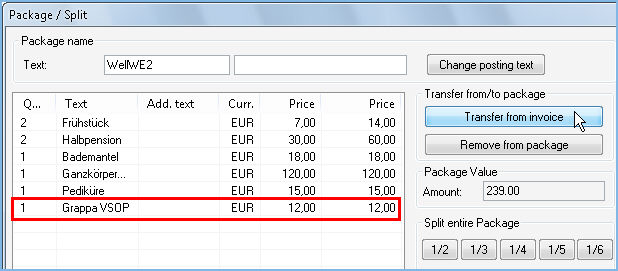
[Remove from package] button: Allows you to remove selected charges so that they appear on the invoice as regular postings and can be printed.
Click one of the buttons [, [, [, [ [ one sixth of the overall amount.
If you want to split off a specific amount, you can enter the amount directly in the input box provided. Then click the “Split amount” button.
In all cases, the charges in the package are split automatically on a proportionate basis.
Click the [ button to void the package.
You can also open the posting details for charges displayed in the Package/Split window. The changes associated with the splitting or voiding of charges can result in changes to the amount shown for the package.
Example:
An incorrect amount was posted for a room rate. The price is to high and you want to reduce the amount. If you split off part of the package, all charges in the package will be split using the same percentage value.
If you want to reduce the accommodation price only, right-click to open the “Package/Split” posting details. Then open the posting details for the charge that you want to reduce. You can now split the relevant part from the charge that you want to reduce.
[Invoice dialog box Check Out]
You can check out invoices on the date of departure or ahead of departure. To perform a check-out, open the Invoice dialog box and click the [Check-Out] button.
 On the guest's day of departure, click the [Check Out] button to close the invoice and post a payment for the invoice items. If multiple partial invoices exist, you must check each one out separately.
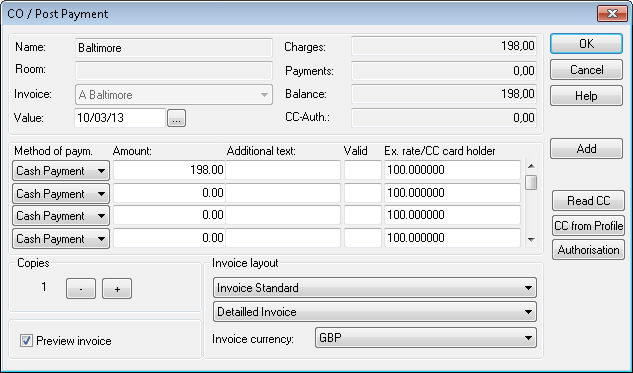
The guest's name, room number, invoice letter (A-F), and the invoice recipient are displayed in the top left of the window.
To the right, you can see the total charges, payments, and ensuing balance. Credit card authorizations are also displayed here.
You can enter the transaction date if this differs from the current date (the transaction date is the date for which payment appears on the invoice).
The central window pane contains four rows for entering different methods of payment and the associated amounts.
|
Method of Paym. |
Shows the method of payment. “Cash Payment” is displayed by default if a different payment method has not been defined for this guest. Select the relevant method of payment from the drop-down list. |
|
Amount |
The outstanding balance is shown automatically and can be overwritten depending on how the guest pays. If you overwrite the amount, any remaining balance is shown on the next row. You can then select a different method of payment for the remaining balance. Any payments made in foreign currencies are converted and displayed automatically (using the exchange rate defined in the system data). If you enter a higher amount (e.g., balance = $72, the guest pays with a $100 dollar bill), the system calculates the change automatically and displays it in the next row. |
|
Additional text / Valid |
You can also choose to enter additional text to be displayed on the invoice. If credit card details were created for the reservation, this box shows the credit card number and the adjacent “Valid” box shows the card's expiration date. |
|
Ex. rate/CC Card holder |
Shows the exchange rate saved in the system for foreign currency transactions or the card holder for credit cards. |
|
Copies |
Specifies the number of invoice copies. |
|
|
If you select the If you clear the check box, the invoice is printed directly. |
[Invoice dialog box Check Out Invoice layout ]
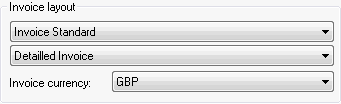
If you do not want to use the default invoice form, use this section to specify the required form. If a form other than the standard invoice is already displayed, this means that a different form has been assigned using the “Invoice print mode” function. (In order to use alternative invoice forms, the forms must first have been defined in the system data.)

Use the drop-down list below the invoice form selection to change the print mode for this invoice (detailed, summarized, etc.).
If an invoicing form has been created that supports different currencies, you can select the currency you want to use when printing the form.
The system also displays a reminder if a guest has hired a safe during his or her stay.
Invoices as PDFs in the guest profile
Create copies of your (Word or HED) invoices and save them into the guest profiles's invoice list. In order to be able to use this function, you will require the protel PDF maker add-on. Please speak with your protel Support for more information!
Invoice form in the language of the invoice recipient ( from version 2013.16.816 )
[Invoice dialog box Check Out Invoice layout ]
Set up protel to always use the “right” language for each guest: The invoice form will open automatically in the language of the invoice recipient. Manual changes of the form in the dialog “More / Invoice print mode” can only take place in the actual language.
Your protel Support team will gladly adjust the mentioned settings for you. Just contact us!
Inserting a separating line ( from version 2013.16.816 )
[Invoice dialog box Check Out Invoice layout ]
Optionally you can add a separating line in the invoice form, for example between the entries of services and payments. As a separator any character is possible:
[UsePaymentSeparator{1}]
[PaymentSeparator{============================}]
Display open amount ( from version 2014.18.067)
[Invoice dialog box Check Out Invoice layout ]
The replacement code $Total enables you to display the amount still open from the sum of charges and debit payments ($Sum-$SumDebit).
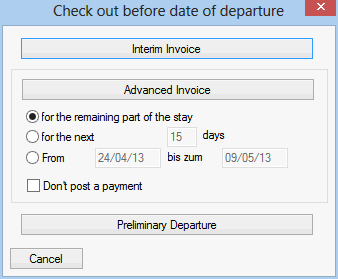
If you click the [ button for an invoice before the guest's departure date, a window appears with the following options:
|
|
Creates an invoice containing all charges posted to date. The “CO/Post payments” window appears so that you can enter the payment method. This posts the payment but the guest remains checked in. |
|||||||
|
|
Calculates all outstanding accommodation charges and fixed charges that have already been created up to the selected period. By default the charges are calculated up to the departure date. If required, you can also select another period (see below: "period selection"). After clicking the [Advanced payments] button, the “CO/Post payments” window usually appears so that you can enter and post the payment. The guest is not checked out and the postings are naturally not repeated during subsequent end-of-day routines.
Period selection
Tick this box to book postings to the invoice without posting a payment.
|
|||||||
|
|
The “CO/Post payments” window appears immediately so that you can enter the payment method. When you click [, a confirmation prompt appears asking if you want to curtail the reservation to today. The guest is then checked out automatically. |
|
|
Available settings for printing invoice |
Your protel partner or our protel Support Team will inform you about the possibilities and will gladly execute the respective settings for you. |
|
|
|
Available user rights |
|
|
848 |
FO Advanced invoice |
Controls access to the “Advanced Invoice” function. |
To open the “Edit invoice” menu, click the button in the Invoice dialog box or use the More... in the Navigator. Follow the link for more information.
You can define a separate storage location for invoices if required (e.g., c:\Invoices). The default directory is \protel\rech. You must back up this directory on a regular basis.
You can also define a separate backup storage location for invoices if required (e.g., c:\backupexample). If a document is not found at the default path, protel will also search using the backup path provided. This allows you to move documents into the backup directory from time to time; for example, if storage space is too expensive at the original location (data center). You must also back up the backup directory on a regular basis.
![]()


 :
:

 Don't post a payment