The More... dialog box |
|
|
Click the [ button to access additional options for modifying the reservation.
|
Available user rights |
|
264 |
FO More dialogue |
Controls access to the “More...” dialog box. |
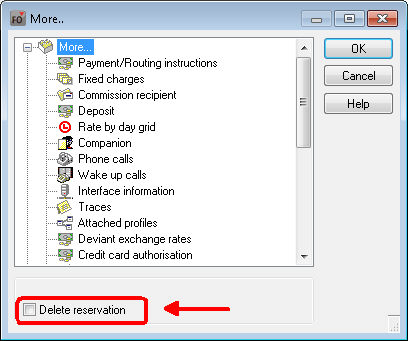
If you select  the “Delete reservation” check box and then click
[ the reservation
will be deleted after confirming a prompt. Reservations can be deleted
only if you have the relevant user rights, if no revenue or payments have
yet been posted for the reservation, and provided that no end of day has
been carried out within the reservation period.
the “Delete reservation” check box and then click
[ the reservation
will be deleted after confirming a prompt. Reservations can be deleted
only if you have the relevant user rights, if no revenue or payments have
yet been posted for the reservation, and provided that no end of day has
been carried out within the reservation period.
|
Available user rights (delete reservation) |
|
79 |
FO Delete Reservation |
Required to be able to delete a reservation from the “More...” dialog box. |
Navigator
 [More...] button Payment/routing instructions
Payment and routing instructions govern the automatic transfer of charges within different guest accounts.
This feature is particularly useful when invoicing group reservations as these usually involve both a collective invoice and separate individual invoices to which part of the revenue needs to be assigned. For instance, this applies to company reservations where the company assumes all costs for board and lodging but the employees pay for individual costs (such as extras). The invoices are therefore perfectly prepared for check-out because all revenue is posted in accordance with the rules stored in the payment/routing instructions.
Open the reservation in the Navigator and click [More...] > Payment/Routing instructions.
Create a payment/routing instruction: Click [New]. This opens the detailed dialog box for creating a new payment or routing instruction.
Open the transaction accounts list: Click [New] again to access the transaction accounts list.
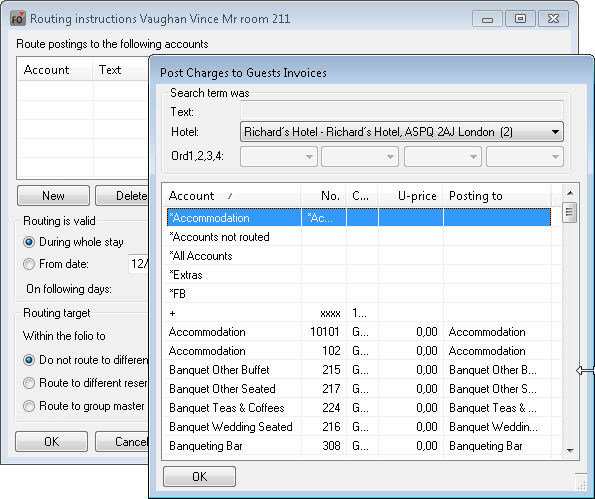
This lists all the transaction accounts as well as the routing codes that have been set up for frequently used payment/routing instructions. Transactions marked with an asterisk* are default transaction accounts that are defined in the system:
*All Accounts |
Transfers all transaction accounts. |
*Extras |
Transfers all accounts from the “Extras”
statistic group |
*FB |
Transfers all accounts from the “FB” statistic group. |
*Accommodation |
Transfers all accounts from the “Accommodation” statistic group. |
*Accounts not |
Transfers all accounts that have not yet been routed. |
Accounts marked with a “+” are user-defined
routing codes.
The transactions stored in the system data are listed at the end.
Select
a transaction account: Double-click an account to select it.
Multiple accounts can be selected and accepted by clicking [OK].
 All revenue for the accounts selected here will be
posted to the routing target that is selected in the lower pane.
All revenue for the accounts selected here will be
posted to the routing target that is selected in the lower pane.
 Keyboard entry: You can
also enter transaction accounts manually in the “Keyboard entry” box.
Use a comma separator to enter additional transaction account numbers.
Click the [ button to add these accounts
to the list.
Keyboard entry: You can
also enter transaction accounts manually in the “Keyboard entry” box.
Use a comma separator to enter additional transaction account numbers.
Click the [ button to add these accounts
to the list.
Define routing validity: Use the following options to further restrict the validity of the payment/routing instructions. This allows you to define the precise routing time.
|
Transfers all the accounts listed during the whole stay. |
|
The transaction accounts listed will be transferred for the period selected. |
|
Here, you can select the weekdays on which you want the transaction accounts displayed in the list to be transferred. Routing will only take place on the days selected. |
Define routing target:
Within the folio to |
Choose the part of the invoice to which the transaction accounts selected within the reservation are to be transferred. |
|
Choose this option if charges are to be routed within the reservation (for example, to Invoice B of the same guest account) |
|
Select this option if you want postings for the selected transaction account to be transferred to a different guest invoice. Click to browse to the reservation. |
|
If the reservation is assigned to a group, the third option is available for selection. If selected, the transaction accounts selected will be transferred to the group master. Click to browse to the reservation. |
Apply settings: Click [OK] to apply all the settings and show these in the routing instructions:
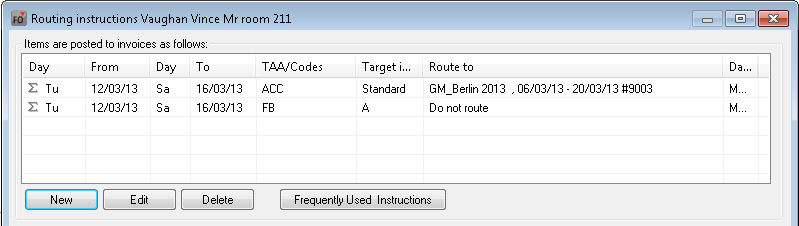
Day = weekday; Target invoice = the target invoice details (A-F for internal, Standard for external routings)
Route
to: Do not route = revenue is routed within the reservation.
For external routings: details of the recipient of the respective reservation.
The lower pane of the “Routing instructions” window shows the invoice recipient and assigned methods of payment stored. If a company or travel agent profile is assigned to the reservation, this will be included on part B of the invoice. Part A of the invoice is always assigned to the guest profile. This cannot be changed.
Changing the method of payment: If a method of payment is selected for the reservation, this is used for part A of the invoice. To change the method of payment for part of the invoice, select it and click [ method of payment required from the list.
Address: The button opens the profile search dialog box, in which you can select a new invoice recipient for the partial invoice.
Secondary address: If an alternative address to the main address has been stored in the profile (e.g. a company address), this can also be selected as the “Secondary address”.
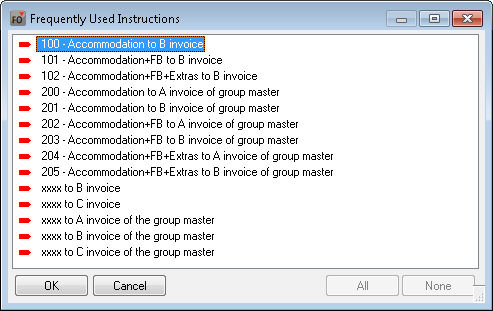
Click the [ button to access a list of freely definable and default routing codes.
Default routing codes are routings that are predefined in the system and would typically be required by most hotels; company reservations for example. In this case, the accommodation costs to be charged to the company’s account would be posted to invoice B.
It is also possible to create custom routing codes; for example, if different revenues from entirely different accounts (accommodation, spa treatments, and parking for example) are to be grouped within a single routing code. Once these have been created, they can be reused for your payment/routing instructions.
 For more information
about creating routing codes, see the protel system data manual.
For more information
about creating routing codes, see the protel system data manual.
Instructions “100” - “205” are the default instructions provided by the system.
|
Available user rights (payment instructions) |
|
72 |
FO Instruction of Payment |
Controls access to payment/routing instructions in the More... dialog box. |
Navigator
[More...] button Fixed charges
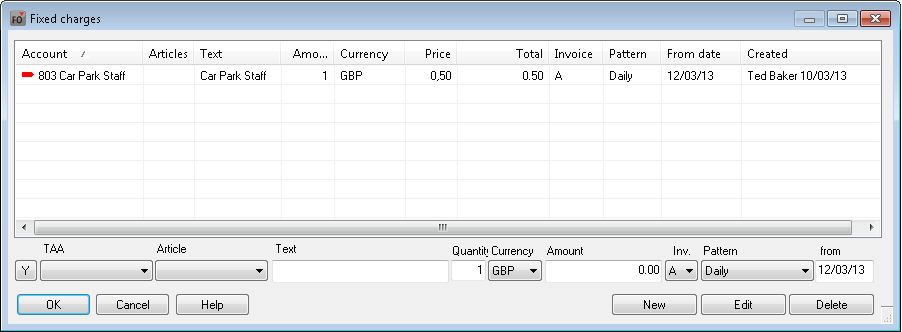
Use this option to enter charges that are to be additionally posted to the room rate at end of day. Example: An additional daily charge of two euro is to be posted for a daily newspaper.
You enter or select the accounts in the lower pane.
 Click [Y] to select an account from the list of all the accounts
available in the system.
Click [Y] to select an account from the list of all the accounts
available in the system.
 Click [New] to use the selected account/article as a fixed charge.
TAA |
Number of the transaction account to which the additional charge is to be posted. You can enter the transaction account number directly or click the input box to open a drop-down list and select the required account. As you start entering the transaction account number, you will see that the account beginning with these numbers is highlighted in the list. |
Text |
The description associated with the transaction account number. This can be overwritten and will be printed on the invoice. |
Amount |
The number of units to be posted |
Currency: |
If you want to use the multi-currency function, you can change the posting currency here. |
Price |
If a fixed price has been assigned to the transaction account, this will be proposed here. You can overwrite this price for any posting. If no price is entered, you can define one for this posting. |
Total |
The total from the amount multiplied by the price |
Inv. |
Drop-down list for choosing the detailed invoice (A-F) on which this fixed charge is to appear (default = A) |
Pattern |
Drop-down list for the posting pattern (default = Daily). |
from |
Date from which the posting (in accordance with the chosen posting pattern) is to commence. The arrival date is displayed by default. |
|
Available user rights (fixed charges) |
|
74 |
FO Fixed Charges |
Controls access to the fixed charges option in the More... dialog box. |
|
Available settings (fixed charges) |
|
|
Navigator
[More...] button Commission recipient
You use this function to assign a reservation to multiple commission recipients of the same profile type.
Commission recipients through profile assignment
This pane lists the commission recipients that are assigned to the reservation automatically from the linked guest profile (4 max.: travel agent, company, source, group). The account number, name, and assigned commission code are displayed.
Additional commission recipients
To add additional commission recipients, click [. Click [ to remove a selected profile assignment for this reservation.
|
Available user rights (commission recipient) |
|
122 |
FO Commission recipient |
Controls access to the commission recipient option in the More... dialog box. |
Navigator
[More...] button Deposit
The deposit function allows you to manage deposits and advance payments.
 From Version 2013.17.672 The deposit will be marked as “used” in the balance
check already during the check-in; in doing so, the deposit’s booking
status changes to “in use”.
From Version 2013.17.672 The deposit will be marked as “used” in the balance
check already during the check-in; in doing so, the deposit’s booking
status changes to “in use”.
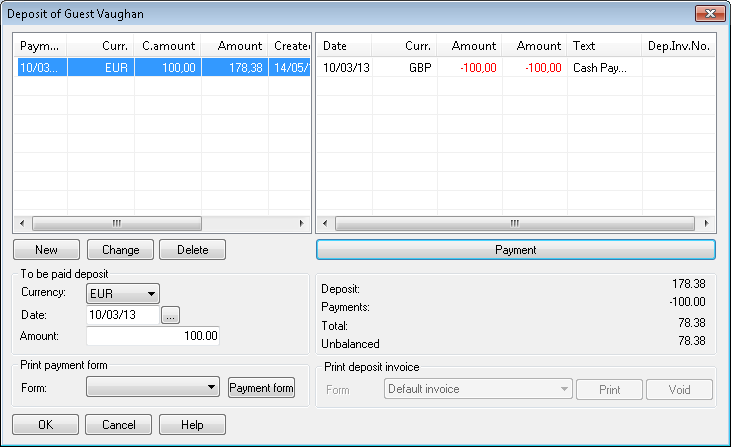
The upper section of the dialog box is divided into two panes, the left showing the deposit due and the right the deposit received.
In the left pane, enter the payment due date:
Currency: The deposit currency.
Date: The deposit due date (the date by which the deposit needs to be paid)?
Amount: Enter the required deposit amount.
[New]: Click [New] to accept your entries.
You can follow the above procedure to enter multiple receivables.
Print payment form (possible only if a data exchange license is installed!)
Guest deposits can be transmitted to the protel HMS automatically by means of a bank transfer via data exchange (using MultiCash e-banking software, for example), where they can then be stored as payments. Click the [Print payment form] to create the payment/transfer form required by the guest for making the payment.
Select the deposit that is to be paid in the upper pane and click [Payment form].
|
Changing the deposit
If you need to change the amount or payment deadline, select the row in the upper pane, enter the changes, and click [Change].
TIP!
To insert the deposit details into the reservation letter, use the following text codes:
|
Click the [ button on the right-hand side of the window.
Enter the method of payment (important for ensuring that the deposit is posted correctly) and the amount paid. If you need to add more than one received deposit payment, click the [Add] button to calculate the total.
Click [ to post the deposit payment entered.
The system also accepts credit card payments. Click [Read CC] or [CC from Profile] to do this.
Once the deposit has been posted, the guest now has a credit balance corresponding to the amount posted. Any charges to be applied will then be posted against this credit.
Print deposit invoice
If the guest requires a receipt for the deposit, you can print out a deposit invoice for payments received. Be sure to select the appropriate deposit form for this printout.
|
TIP!
|
|
Available user rights (deposit) |
|
122 |
FO Deposit |
Controls access to the deposit option in the More... dialog box. |
|
|
|
|
Navigator
[More...] button Rate by day grid
You use the RBD grid to define different rates or rate codes for specific days of the stay (e.g., if a guest has booked a package for a single day or is entitled to a special rate for one night). You can also use it to change the number of persons for specific days of the reservation.
More examples:
A conference speaker is arriving one day early and receiving a discount for this day
A guest books for his wife to join him for the weekend at half-board (instead of the usual bed and breakfast)
The RBD grid easily accommodates changes such as these. protel posts the information stored here automatically for the specifically scheduled days.
The upper pane shows each day of the stay on a different row. Once guests have checked in, protel shows only the days still to be posted.
In general:
Select the row of the day of the stay that you wish to change
Select the check box adjacent to the entry you want to change, and enter the required values (or select a value from the list).
Click the [
Changing the number of persons or number of additional beds/cribs
|
Select the check box and enter the new number of persons. The price will be updated accordingly based on the rate code. |
|
Select the check box and enter the number of children in the appropriate category box. |
|
Select the check box and enter the number of additional beds/cribs required. |
Changing the rate
NOTE:
If an amount has already been changed manually in the Navigator or when
entering the reservation, no change will be made here because manual rates
are fixed.
|
If you need to change the rate, select the
Reset special rate to default rate You can reset a special
rate to the default rate by selecting the |
|
To assign a new rate code, first select
the day for which the rate code is to be changed; then select
the
You can define a starting date for the application of this rate code. If you do not want the rate code to apply directly from the date of arrival, select the Use rate avail. of check box and enter the required date. |
Other
|
Set market code |
|
Set source code |
|
Set guarantee code |
Packages |
If there are any packages stored for a rate code in the system data, you can use the [ button to assign these to specific days. |
Right-click a date to view the associated rate information or price information per person. Select the required information from the context menu.
NOTE
|
|
Available user rights (RDB grid) |
|
95 |
FO Rate by day table |
Controls access to the “Rate by day grid” option in the More... dialog box. |
|
Available Settings (RDB grid) |
The mode for the rate search can be preset in the rate-by-day grid. Depending on the set mode, the evaluation results change for the LOS (Length of Stay) strategies of the rate availability and the limitations on the rate code details. 0= Evaluation of the rate availability assuming the entire time of stay 1= Evaluation of the rate availability assuming a check-in from today until the end of the booked time of stay 2= Evaluation of the rate availability assuming a daily arrival and departure (Daily BAR)
|
|
Navigator
[More...] button Companion
Registration laws in some countries stipulate that guests have to fill out a registration card when they arrive at the hotel. All data associated with this can be stored using the “Companion” function, where you can enter all accompanying persons and persons subject to this registration requirement (for example, the reservation was booked by Mr. Smith and his companions are his wife and his son, who is subject to the registration requirement). Ideally, you would enter the companion details at the time of reservation since this will allow for preparation of the registration cards prior to the guests’ arrival.
NOTE:
|
Open the reservation in the Navigator and click [More...] > Companion.
In the “Companion”
tab, enter the details of the companion, including their name, date
of birth, and passport number.
Information such as nationality and language is transferred directly
from the profile assigned to the reservation. If the nationality or
language is different from that of the guest making the booking, you
can change it here.
Version 2015.19.030
The button for scanning business cards controls the connected business card scanner so that the field for the companions can be directly filled when scanning. HINT: This button only functions if the business card scanner interface has been set up.
Figure: Navigator > More... menu > Companion: Button for scanning business cards |
Click [OK] to apply the companion settings.
You can enter family members in the guest profile and then add these to the reservation as companions. This saves having to re-enter their names and dates of birth the next time this guest stays at the hotel with the family.
Click the [ button. If family members have been entered in the guest profile, click the relevant entries to add them to this reservation.
The “Stays” tab is required if companions will be staying for a different period. The relevant dates can be entered here.
|
Available user rights (companion) |
|
76 |
FO Companion |
Controls access to the “Companion” option in the More... dialog box. |
|
Available settings (companion) |
Display companion in Navigator's treeview: Upon request, companions from the "More..." menu can be displayed in the Navigator's treeview..
|
|
Navigator
[More...] button Phone calls
If the system has a PBX interface, this option takes you to a log of all calls made by the guest. It shows the date and time of the calls, the number of units, the amount charged, and the phone number called. Use the drop-down list to choose whether to show telephone charges for all invoices or a specific invoice window.
Click the [ button to print the list. A list of all calls might be required by the guest, for example, to settle up with his or her company.
|
Available user rights (PBX IFC) |
|
77 |
FO Telephone Protocol Guest |
Controls access to the “Phone calls” option in the More... dialog box. |
Navigator
[More...] button Wake up calls
This option is particularly useful for hotels that have an appropriately configured PABX interface. Any wake-up calls that you enter in this dialog box are communicated to the PABX and processed automatically. The wake-up call management feature can also be useful even if you don’t have a PABX interface since you can print out wake-up call lists from Reporting that you can use to make and monitor the calls manually. The process steps are the same either way.
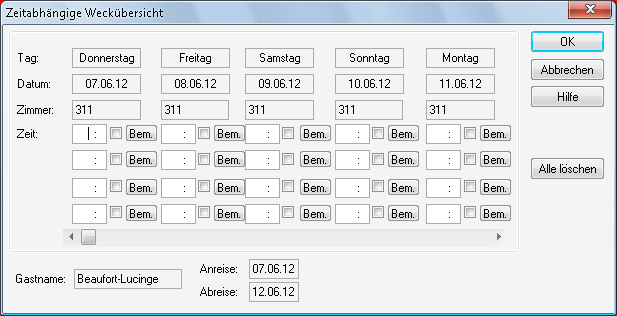
You are only shown the days reserved for the guest’s stay. You can enter up to four different wake-up times per day.

As soon as protel receives confirmation from PABX that a wake-up call has
been made, it selects the relevant check box.

The [
relate to the wake-up call.
to clear all entered wake-up calls.
If you wish to delete only one wake-up call, double-click the entry and press the “Delete” key.
|
Available user rights (wake up calls) |
|
324 |
FO General view of wake up calls |
Controls access to the “Wake up calls” option in the More... dialog box. |
Navigator
[More...] button Interface information
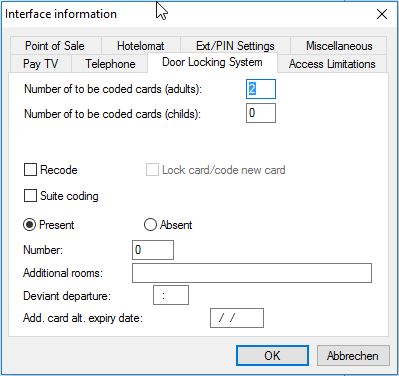
Use the protel.ini to activate this feature.
If various interfaces are available, you can use this feature to define guest-specific settings for each interface, e.g. for Internet access, for connected access control systems, telephone settings, Pay TV etc.
|
Available user rights (IFC) |
|
287 |
FO Additional IFC features |
Controls access to the “Interface information” option in the More... dialog box. |
HINT:
|
Navigator
[More...] button Traces
In protel PMS, traces are important internal guest-related messages or tasks for different hotel departments. For example, a trace can be created for the kitchen if a birthday cake needs to be prepared for a guest, or for housekeeping if a bouquet of flowers is required in a room.
For an overview of traces, go to the trace report (“Reports > Traces”), where you can view all the traces by date. You can also generate a trace report when you complete the end-of-day routine.
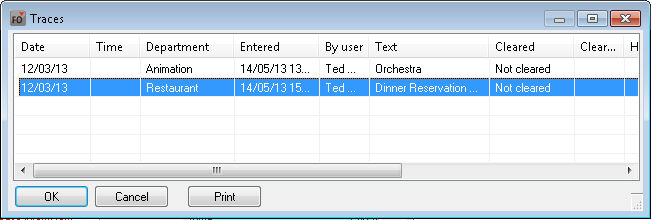
The “Traces” dialog box lists all the traces stored for a reservation. This provides a clear overview of the dates and times of the required traces, the departments affected, the name of the users who entered the traces, the times the traces were entered, the respective tasks, the task status, and, the name of the user who completed the task if it has been completed already.
Traces can also be saved in the guest History. This is indicated by an “X” in the “History” column.
To access the edit function of the Traces dialog box, right-click to open the context menu:
New |
Opens the Traces dialog box, in which you can create new traces (see below) |
Alter |
Opens the Traces dialog box, in which you can change traces (see below) |
Delete |
Deletes the selected entry. |
Add trace package |
If trace packages have been stored for departments in the system data, these can be accessed here (see protel system data manual). In this case, there is no need to enter any additional information because the traces will be transferred from the trace package automatically. |
Cleared |
Sets the trace entry to “Cleared”. A check
mark will then be shown adjacent to the trace in the Navigator: |
Not cleared |
Sets a trace marked as “Cleared” to “Not cleared”. |
Traces History |
Opens the Traces History in the guest profile. |
View document |
Opens a document that is associated with the trace entry. |
Delete document assignment |
Removes a document that is associated with the trace entry. |
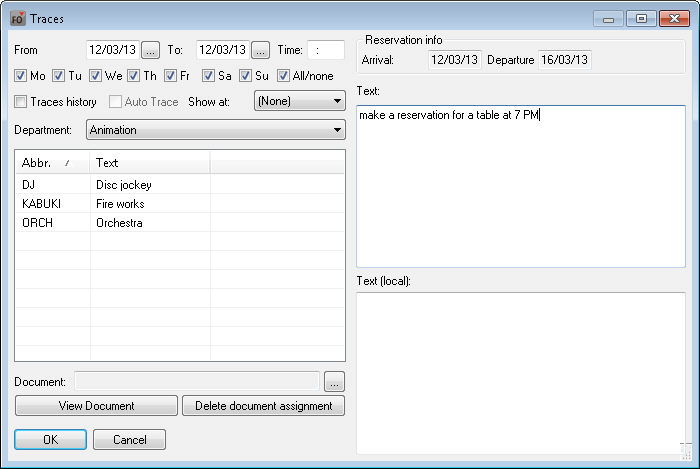
The dialog box for creating/altering traces is divided into several panes:
From / To / Time: You enter the date or period and time the trace must be completed here.
Reservation info: Displays the reservation period booked.
Weekdays (as of version 2013.16.690
of Jan. 22, 2013): You can define specific weekdays on which you want
the trace to appear for a period. The period must be entered from
the first trace to the last trace. This cannot be transferred to the Auto
Trace; it applies only for unique traces.
Traces History: If you select
this check box, the trace will also be saved in the Traces History of
the guest profile.
Auto
Trace: If you select this option, the trace entry will be saved
after reservation check-out and set automatically each time the guest
makes a new reservation.
Show at: Causes a trace to be shown in association with a specific action (reservation, check-in, check-out).
|
Department: Select the department responsible from the drop-down list. The table below lists the predefined traces for the respective department. Double-click to insert traces listed here in the text box.
Text: If you choose not to insert any traces from the table (see above), you can enter your own text here.
Text (local): In this box, you can enter text in a local language that uses a different character code (e.g. Arabic). For more information about local text boxes, see: Hints and tips > Local text boxes.
Document (as of version 2007.11.395 ): Click the [...] button to store a document associated with the trace entry. This could be a menu, for example, if the guest has reserved a table for the restaurant, or a greetings card that can be accessed and printed out for a birthday trace, or even detailed trace-related instructions for employees, and so on. Documents stored here are saved centrally at path <protel>\TRACEDOC, which can be accessed from any workstation.
|
.
If at least one open
trace exists, an exclamation point will appear in the Navigator:

|
Available user rights (traces) |
|
223 |
FO Traces history |
Controls access to the “Traces History” option in the context menu (More > Traces > right-click > Traces History) |
230 |
FO Delete traces |
Determines whether or not traces can be deleted |
231 |
FO Clear traces |
Controls access to the “Trace cleared” option in the context menu (More > Traces > right-click > Cleared) |
232 |
FO Modify traces |
Users not assigned this right will not be able to edit traces. |
233 |
FO Traces |
Controls access to the trace report. Users not assigned this right will not be able to view traces by selecting “Reports > Traces”. Access from the Navigator will be denied and the subtree for traces in the More dialog box will be grayed out. |
365 |
FO Traces Document |
If the document linking feature for the Traces dialog box has been activated, this user right controls access to stored trace documents. |
|
Available settings (traces) |
Have traces been assigned to a reservation, a notice will appear informing you that the reservation has been altered. This notice window will also appear when cancelleing reservations. |
|
Navigator
[More...] button Attached profiles
You can attach another guest profile to a reservation. protel interprets the attached profile as an accompanying person and uses this person’s details for registration purposes. A guest profile for the accompanying person must exist (or be created) in protel; the companion does not then need to be entered manually from the More dialog box.
|
Right-click anywhere within the dialog box to open the context menu, which contains the following editing options:
Attach new profile |
Opens the Search Profiles dialog box. If the required profile already exists, double-click it to select. |
Link family profiles |
Opens the “Family” tab of the guest profile, where you can assign other profiles. The profiles assigned here are saved in the guest profile (“Family” tab). Right-click to add a family member. To insert family names, simply right-click the name box in the search form and select "paste":
When assigning family members, you can define the guest’s relationship with individual persons/companions. To do this, select the entry and choose the relationship from the drop-down list at the lower edge of the dialog box. You can also enter your own text in the “Text” box. Note: Relationships can be stored in the system data under “Reservation” > “Guest profile codes” > “Family Relationship Types”. |
Profile linked to other reservation |
Opens the reservation list containing all the reservations that fall within the posting period of this reservation. Double-clicking one of these reservations deletes the link with the original reservation and creates a new link. |
Delete attachment |
Deletes the attachment. The formerly attached profile is retained. |
View profile |
Opens the attached profile. |
Change additional information |
You can enter more information about the attached profiles in this dialog box.
You can enter deviating data for accompanying persons or family members here and choose the type of person from the drop-down list. |
Move up / Move down: |
If multiple profiles have been attached, you can sort these in the list to gain a clearer overview. |
|
Available settings (attached profiles) |
The navigator offers the possibility of viewing the arrival and departure date of linked profiles. An additional setting, one can check to see if the arrival and departure dates of the linked profile are located within the time-period of the reservation.
An additional setting has the effect that additional information of linked profiles will no longer be able to be edited after the departure date of the linked profile.
|
|
|
Available user rights (attached profiles) |
|
227 |
FO Attached profiles |
Controls access to the “Attached profiles” option in the More... dialog box. |
Navigator
[More...] button Deviant exchange rates
You can use this option to define an individual exchange rate for a reservation. This will overwrite the global exchange rate for this reservation.
Select the
“Fix exchange rate for this reservation” check box.
You can then choose
to define a specific exchange rate for
a currency or select a date that is to provide the basis for the currency
exchange rate.
|
Available user rights (deviant exchange rate) |
|
227 |
FO Deviant exchange rates |
Controls access to the “Deviant exchange rates” option in the More... dialog box. |
Navigator
[More...] button Credit card authorization
|
You perform credit card authorization to verify the card validity and credit limit. The amount you enter can range from the rate for one night to the cost of the entire stay.
|
Available settings (credit card authorization) |
If an EFT interface is used, the interface returns a token to protel upon authorization of the payment request. This token can be displayed in the Navigator under the sub tree "Additional reservation information". The token stands for the successful authorization of a credit card payment (=result of a positive check).. For mor information, see section Navigator > Invoice pane > CC Token. |
|
|
Available user rights (credit card authorization) |
|
194 |
FO Credit card authorisation |
Controls access to the “Credit card authorization” option in the More... dialog box. |
Navigator [More] button
Edit invoice
A number of additional invoice processing options are offered here. You can also access the options listed here by clicking the [ button from within the invoice form.
Navigator
[More] button Edit invoice Information
invoice
Print out of an invoice that shows all registered charges up to now (can be used as a receipt for payment receipts).
|
Available user rights |
|
83 |
FO Info Sample Bill / Invoice |
Controls access to the “Information invoice” option in the More... dialog box. |
861 |
FO information invoice in CO Status |
Deactivates the “Info Invoice” button in the invoice overview once a reservation status is set to checked out (also if the user during the process of check out) |
|
Available settings (information invoices) |
|
|
Navigator
[More] button Edit invoice Invoice
print mode
Summarization and sorting of items
The following different options are available for printing out the guest invoice:
Detailed invoice: If you select this option, every individual posting is printed; nothing is summarized.
TAA summarized by day: Causes postings for the same transaction account to be summarized by day.
TAA summarized by stay: This option is chosen by default. Postings for the same transaction account will be summarized by stay (one row for accommodation, one for telephone, one for minibar etc.).
TAA summarized by guest names: This option is particularly recommended for group invoices because the individual charges are assigned to each guest.
TAA summarized per rooms: This setting can also be useful for group invoices.
Summarize EOD charges only: With this option, all postings that are posted as part of the end-of-day routine (room rates and other fixed charges) are summarized and any additional postings are printed out in detail.
Summarize TAAs to total package: Same as “TAA summarized by stay”, but also summarizes all accounts as total packages; in other words quantity = 1. This is useful for weekend arrangements that involve daily posting at different daily rates.
Summarize EOD charges to total packages only: With this option, only EOD postings are summarized as total packages; all other postings will be printed in detail.
TAA summarized by guest, sorted by res.no.: This setting can be useful for group invoices. The charges are assigned per guest and sorted by the guest reservation numbers.
Detailled invoice, sorted by TAA main groups: With this option, the postings are not summarized, but sorted by the main groups defined in the system data; for example, accommodation, hotel bar, spa treatment, and so on.
TAAs summarized per day, sorted by TAA main groups: Postings for the same transaction account are summarized by day and sorted by the defined main groups.
TAAs summarized per stay, sorted by TAA main groups: With this option, all postings for the same transaction account are summarized for the entire stay and sorted by the defined main groups.
Invoice Layout
Additional invoice forms to the standard invoice can be stored in the system data. Choose the invoice form you require from this drop-down list.
You can also define the currency to be used for this invoice. To be able to do this, the currencies and exchange rate must have been created already (see the Exchange rates chapter).
Lease invoices for long staying guests (available only after activation)
You use this option to define the invoicing procedure for long-term guests. Please contact our support team if you require the separate guide that explains this in more detail.
|
Available user rights |
|
80 |
FO Modus Invoice Printing |
Controls access to the “Invoice print mode” option in the More... dialog box. |
Navigator
[More] button Edit invoice Pro
forma invoice
The pro forma invoice calculates the accommodation costs for a guest or group in advance and displays these on an invoice form. These costs are calculated on the basis of the rate code, the stored fixed charges, and the stored packages.
Pro forma invoices can only be generated before the guest checks in. |
A pro forma invoice for a group can be created from the group master. It is important that the split has already taken place (i.e., that individual reservations exist) for group members at the time the invoice is generated.
Charges are not posted at this time. An advanced invoice is created only for charges according to rate code and fixed charges.
Immediately after choosing this function, the “Invoice print mode” window (see above) appears, in which you can then choose the required invoice mode and form.
A dialog box then appears, in which
you choose whether to create the pro forma invoice for the entire
stay or for a specific number of days only:
Enter days: Enter the number
of days and click [OK] to confirm.
Select the invoice window (A,B, C, etc.) for which you want to create the pro forma invoice. Routings to other invoices/invoice windows will be taken into account here.
The pro forma invoice is not given an invoice number. If you would like pro forma invoices to have invoice numbers, this can be configured in the system. Note that the invoice number is allocated by the final check out for the reservation. If the invoice section on which the pro forma invoice was based is not used, the invoice form is retained and is stored within the system.
|
Available settings (pro forma invoices) |
|
|
Navigator
[More] button Edit invoice Invoice
history
Shows all previous invoices for this guest.
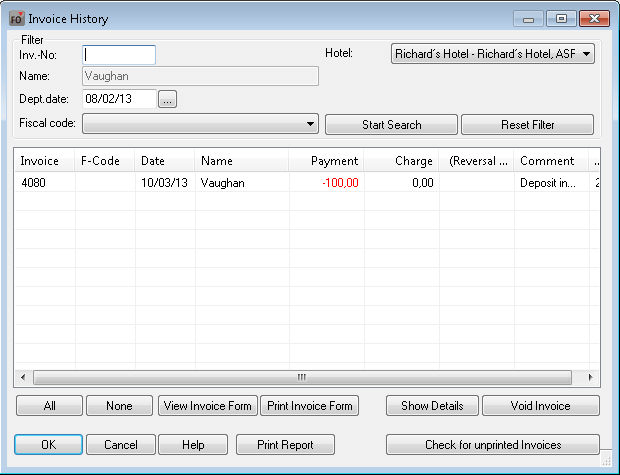
The functions in the upper pane of the dialog box allow you to filter your search by specific criteria. Enter an invoice number, a date, and/or a fiscal code, and click [. Click the [ button to clear all the filter criteria.
All of the invoices matching the entered search criteria will be displayed in the center of the window. If you do not set any filters ([Reset Filter]+[Start Search]), all of the invoices for the guest will be listed.
You can select invoices individually or all at once (click the [All] button).
The following functions are available for the selected invoices:
Opens the invoice form on screen. |
|
Prints the invoice form. |
|
Provides a detailed breakdown of all invoice items. |
|
Opens the “Void invoice” window (see below) |
|
Prints a list of invoices. |
|
Opens invoices that have not yet been printed for editing purposes. |
You use this option to void invoices retroactively. This creates a void invoice and, if only a part of the invoice is being voided, a new, corrected invoice.
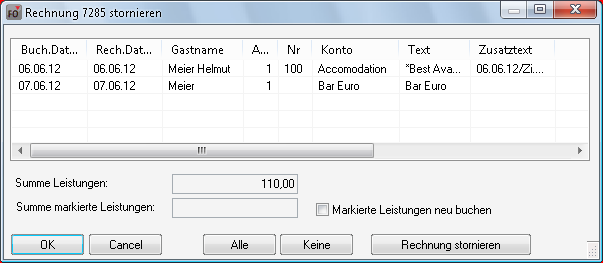
The dialog box lists all items from the invoice. The lower pane shows the total charges and the total for the individual items selected.
Post marked
items to new invoice: If only part of the invoice is to be voided,
select the charges that are to be reposted after the void (one by one
or by clicking the /
buttons) and select the Post
marked items to new invoice check box. Then click [ to complete the procedure.
This will generate a void invoice in invoice window A and the new invoice
in invoice window B. From the invoice window, you can now check out the
newly posted charges.
For more information, see also “Cash Register”, “Invoice History”!
Navigator
[More] button Edit invoice Advanced
payment
From
version 2013.17.000:
This function can also be added to the Navigator's tree view. Ask your protel Support Team to set up your
protel system accordingly! We’re happy to help.
If the guest makes an advanced payment either at the time of or after arrival, you can enter and post the payment here. The payment will be posted directly to the guest account. This payment will be included in the daily balance calculation.

Guest information is shown in the upper pane of the dialog box.
Invoice: From the drop-down list, select the part of the invoice to which the advanced payment is to be posted.
Value: Choose the date on which the credit is to be entered (if not today’s date).
Method of paym.: Select a payment method and enter the amount:
|
If the guest is paying cash, you can enter more information in the “Additional text” box. The other boxes remain blank. |
|
For credit card payments, you can either read the card details by clicking [ or, if the card information is already stored in the guest profile, transfer the details by clicking [. In the latter case, the “Additional text”, “Valid”, and “Card holder” boxes will then be populated automatically. Alternatively, you can authorize the credit card. In this case, the amount entered is guaranteed by the hotel, which has verified that the amount is covered by the credit card limit. The amount entered is then transferred to the “CC-Auth.” box. |
|
For payments in a foreign currency, the stored exchange rate is shown under “Ex. rate”. |
|
Available user rights |
|
82 |
FO Post deposit |
Controls access to the “Advanced payment” option in the More... dialog box. |
Navigator
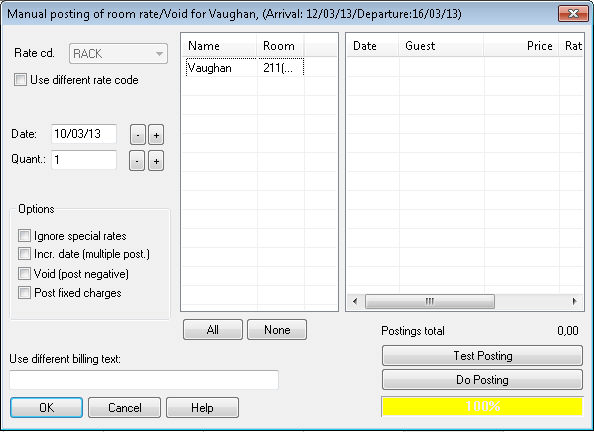
[More] button Edit invoice Manual
rate code posting
This option is for posting or voiding rate codes and additional fixed charges manually (“More...” button, “Fixed charges”).
Note that, unlike advance
invoices, the postings made here are effected in
addition to the rate codes/fixed charges posted during an end-of-day
routine.
Rate code: The box in the top left shows the rate code that was entered for the reservation.
Use different
rate code: If you want to post a different rate code, select the
Use
different rate code check box. This makes the rate box editable,
allowing you to select a different rate code.
Date: Choose a date for which the room rate is to be posted. You can enter the date directly or use the [+]- or [-] buttons. This function is used for price determination purposes only. The posting will always be made to today’s date. The date does not need to be within the reservation period.
Quant.: You can also enter the quantity to be posted, meaning the number of nights rather than number of persons.
Options: The following options are available for selection:
|
If you select this option, any special rates that were entered in the Navigator or Rate by day grid will be ignored (for example, if a different number of persons has been specified for a specific day). This check box will be selected automatically if you choose a different rate code to that specified in the reservation. If you do, however, still want special rates to be taken into account, you can clear this check box again. |
|
If you select this check box, the posting date is shown in the additional text for the postings and printed on the invoice. |
|
Use this check box with care. Selecting this check box and clicking [ voids the rate code that was set above. Note that the revenues will be voided internally in accordance with the stored split tables. |
|
If you select this check box, the fixed charges created under “Fixed charges” will also be posted or voided. |
Use different billing text: In this box, you can enter free text that also appears on the invoice. If you leave this box blank, protel displays the rate code text.
In the center of the window, the name of the guest for which the posting applies is highlighted. If you accessed this function from a group master, all the guests in the group will be listed here. In this case, all the guests will be highlighted, but not the master itself. Click individual guests or click the [ or [ buttons to select or remove guests to be posted.
: Before completing the posting, you can display in the second window a list of the postings to be made according to the conditions entered previously. This gives you an opportunity to check the list and amend if necessary before posting the revenue.
: Click this button to complete the posting to the invoice. If at this point you notice that the settings are incorrect, you can only make corrections by voiding the invoice or deleting items from it.
Navigator
[More] button Edit invoice Date
of next rate code posting
You use this option to set the room rate posting date to an earlier or later date.
Next room rate is posted: |
Shows the next room rate posting date. You can change this date. |
Room rate is posted (nights) |
Shows the number of room rates that are still to be posted. |
Resets the accommodation date to the arrival date. |
|
Sets the accommodation date to the date of departure and sets the number of room rates that are still to be posted to zero. This option can be used to make correction postings after an advanced invoice. The date of the next room rate posting is set to the date of departure as a result of the advance invoice. If the incorrect rate code was posted for the advance invoice, this can be rectified by resetting the date, changing the rate codes, and reopening the advance invoice to post the correct rate to it. This function can also be used to set the date to a later date if the room rate posting is to be postponed for the following days. |
|
Available user rights |
|
116 |
FO Change date of next lodgment posting |
Controls access to the “Date of next rate code posting” option in the More... dialog box. |
Navigator
[More] button Edit invoice Transfer
charges to other invoice
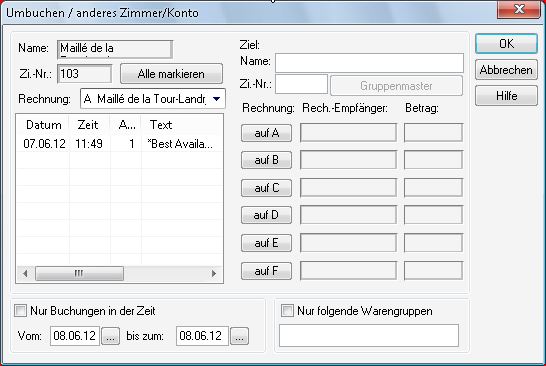
This offers an additional option for transferring charges (to supplement that explained in Transferring charges to another partial invoice).
The window is divided into two panes. The left pane lists the data for the invoice containing charges to be transferred (the source invoice). The right pane lists the invoices to which the charges are to be transferred (the target invoice).
The details (name, room number) are displayed for the guest whose charges are to be transferred.
Click [ to select all the charges listed. If you only want to transfer individual charges, click the relevant ones to select.
If you select the Charges with posting date
check box and enter a period, the system will only transfer the charges
that fall within this period. If you select The following TAAs only
check box and enter the transaction accounts, the system will only post
charges for the specified accounts. Use a comma separator when entering
multiple transaction accounts.
Enter the room number or name of the guest account to be posted. If a group master exists, you can click the button to post to the master account.
The individual partial invoices of the target guest account are displayed below this. If balances already exist, these will also be listed. To post the charges to the appropriate partial invoice (A, B, C etc.), click the corresponding button (, etc.).
|
Available user rights |
|
81 |
FO Transfer charges to room |
Controls access to the “Transfer charges to other invoice” option in the More... dialog box. |
Navigator
[More] button Edit invoice Collect
charges from group members
You use this option to post charges for group members to the Group Master.
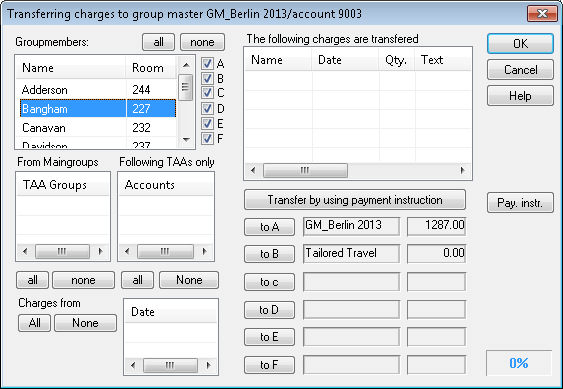
All charges for all group members are listed by default and will therefore be included in the transfer posting.
To select specific charges to be included in the transfer posting, simply click the relevant entries (guests, TAA main groups, transaction accounts, individual postings). These postings will be listed in the top right under “The following charges are transfered”.
Groupmembers:
Lists the names and room numbers of all group members.
Please
note that only checked in group members (members with status CI) will
be displayed!
All of the members are selected by default,
meaning that charges will be transferred from the invoices of all guests.
You can, however, select individual guests to be included in the transfer
posting. You can also click the [
or [ button to
select or deselect all guests respectively. You use the
A - F check boxes
on the right if you wish to include charges from specific detailed invoices
in the transfer posting.
From Maingroups / Following TAAs only:
These boxes show the TAA main groups and transactions accounts for which postings have been made to guest invoices. Select the specific charges you want to transfer to the master by selecting the required main groups and transaction accounts.
Charges from:
With this option, you can select charges that were posted on specific days to be included in the transfer posting. Simply choose the days in question. You can use the [ and [ buttons to quickly select or deselect all dates listed.
The following charges are transfered:
This box, which is situated in the top right of the window, lists all the charges selected. You can also select individual charges from this list.
To transfer the posting of the selected charges
to the required group master invoice, click the relevant button ( -
-  ).
).
Click the [ button to open the routing/payment instructions for the group master. See the “Payment/routing instructions” for more information about this window. Click the [ button to complete the transfer posting in accordance with the routing/payment instructions stored.
|
Available user rights |
|
96 |
FO Transfer to Group Master |
Controls access to the “Collect charges from group members” function. |
Navigator
[More] button Edit invoice Print
reports
Displays/prints a report showing all the posted invoice windows of the guest.
![]()


 Include the deposit information on the reservation letter
 Your
Your 
 Good to know: If the check box is selected, the rate has already
been changed manually:
Good to know: If the check box is selected, the rate has already
been changed manually: