 Cash Register
 Accounts Receivable
Accounts Receivable |
Front
Office  Cash Register
 Accounts Receivable
|
|
All invoices that you have checked out using a debit payment method or credit card are transferred directly to accounts receivable management. An accounts receivable account is automatically opened for the invoice recipient of all invoices on account. Credit card receivables are summarized on a group account for each credit card.
You use different tabs to access the individual areas of accounts receivable management.
|
Available user rights |
|
56 |
FO Accounts Receivable |
Authorizes the user to access accounts receivable management. |
167 |
FO MPE A/R global view |
For protel MPE: Authorizes the user to access accounts receivable management for each hotel in the group (using the drop-down list). |
[Cash Register | Accounts Receivable | Accounts]

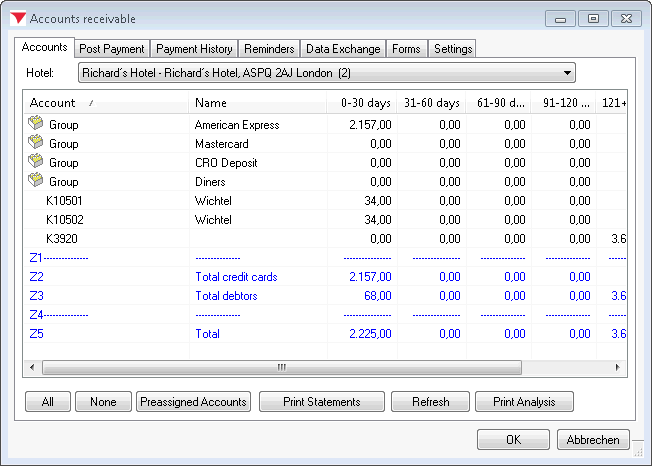
This tab provides an overview of all accounts with outstanding amounts. The upper window pane shows detailed information with the name and the outstanding amounts for the last 30 days, 30-60, 90, and more days. The last column shows the total amount for the open account.
Guest accounts are indicated by a “K” followed by a number; credit cards (“CC” character from the system data) are indicated by the prefix “Group.”
The buttons perform the following functions:
Selects all displayed accounts. |
|
Clears all selected accounts. |
|
In a guest profile, you can preassign a guest for the printing of accounts receivable account statements by opening the “A/R” tab and selecting the “Send statements if balance” or “Send statements even if zero balance” option. When you click the [Preassigned Accounts] button, the accounts for these guests are automatically selected in the list of open accounts. Then click [Print Statements]. Using this feature, you can print a monthly account statement by clicking just two buttons. |
|
Prints a form defined in the system data for the selected accounts. |
|
Refreshes the display. Required only if you have settled due postings. |
|
Creates a report that evaluates the outstanding items by their “age” (age of the invoice and debt). |
[Cash Register | Accounts Receivable | Post Payment]
You use this dialog box to edit the individual debts and post payments.

In order to provide a clearer overview, the  Display
payed off debts check box is not selected by default. In other
words, only outstanding accounts receivable are shown. If you select the
check box, all paid off accounts are shown in gray.
A number of different selection options are provided at the top of the window so that you can find the relevant accounts as quickly as possible.
Account |
Select the account number, which comprises the letter “K” and the number of the guest profile. Credit card accounts are indicated by a “Z.” |
Name |
Select an account by the name of the invoice recipient. |
Invoice |
Select an account using the invoice number. The system also displays the date and amount and sorts the entries by invoice number. |
Amount |
(After the “Invoice” drop-down list). Select the amount. The date and invoice number are also displayed. |
Once you have selected an account, the system displays all outstanding debts. Use the lower window pane to post payments for these debts.
The first drop-down list shows the payment type created as “non-cash” in the system data. The date corresponds to the date of the posting. If a different currency is assigned to the selected payment type, the relevant currency appears in the currency field automatically.
Use the next box to enter the amount received as a payment. If only a partial payment has been made, enter the amount of the partial payment only. An outstanding amount will continue to exist in the system. The next text box shows “Payment” by default and can be overwritten if required.
Commission postings
Use the “Commission” row to post a commission payment or discount: Enter the amount in the first box. Then use the drop-down list to select the transaction account to which the posting is to be made.
When making a commission posting, ensure that only the reduced amount is entered as the incoming payment. The remaining amount is then posted as commission and a negative posting is made to the corresponding transaction account for commissions.
Click the [Pay off] button to make the posting. The next window again shows the data that you have entered. Confirm the window to make the posting. Click to return to the entry screen and make any required corrections.
Paid off debtors are displayed in gray in the list of debts. They are deleted from accounts receivable management after a predetermined amount of time. It does, however, remain possible to verify the incoming payment.
NOTE:
|
If a payment is made that is higher than the debt, the difference is posted to the accounts receivable account as credit. The amount can then be assigned using one of the following invoices.
If the debt to be settled is not selected when posting a payment by mistake, the amount entered is entered in the account as an unallocated payment.
To allocate the payment, select the unallocated payment and the debt. Right-click the unallocated payment and select “Summarize to batch” from the context menu.
This allocates the amount to the debtor and reduces the debt accordingly. If the unallocated payment settles the debt in full, it is shown in gray to indicate that it has been paid off.
View invoice form xxx |
Opens the invoice form, which can also be viewed using the invoice history. |
View invoice details xxx |
Shows the individual posting items for the invoice. This allows you to see the actual postings if postings on the invoice have been combined to form a package or if postings have been renamed. |
Void invoice xxx |
Allows you to void the entire invoice. See also Cash Register “Invoice history” - “Voiding an invoice.” If a correction has been made, both the original invoice and the canceled invoice are shown. Both can be combined to reduce the amount owed on the account. |
View profile xxx |
Opens the guest's profile. |
Create void invoice |
If you need to correct an invoice (incorrect room rate has been calculated), the system generates a passerby invoice showing the guest profile and payment type. You can then make corrective postings to this invoice. If you need to reduce the amount, you must make a negative posting. You can also create a new invoice showing the changes you have made. You can combine the posting that has been created with the debt (see below) so that the debt shows the correct amount. |
Edit comment |
Enter a comment for the selected debtor. |
Select status |
Enter a status defined in the system data for the debt. |
Transfer marked debts |
If you select this function, the selected debts are posted to a different account or a different guest profile. You use the “Guest search” dialog to assign the debt. |
Transfer marked debts to group account (CC) |
If a debtor pays by credit card, you can repost the debt to the relevant credit card account from within accounts receivable management. A window appears showing all available credit cards. Double-click to select the relevant card.
The transfer posting of debts to another profile or account can be regulated by the User Right No. 878. |
Create summarized invoice |
This function is used only in connection with fiscal codes. It summarizes multiple invoices if they have a fiscal code that permits summarized invoicing. This function is used only in Italy. |
Print report |
Print an individual account statement for all debts associated with this account. |
This account: print today's pay offs |
If debts have been paid off during the course of the current day, you can use this function to print a list of all the day's payments. This printout is particularly useful for checking payments made for group accounts (credit cards). |
All accounts: print today's pay offs |
If debts have been paid off across all accounts, you can can use this function to print information about today's payments without having to access the reporting functions. |
Display payed off debts |
Shows debts that have already been paid off. Click the menu item to enable or disable this function. |
If you select two debts, the following additional options are available in the context menu:
Summarize to batch |
Summarizing debtors to a batch allows individual invoices to be allocated better in group accounts. Batches are indicated by a summation sign in front of the invoice number. If you have selected different credit card postings and summarized them to a batch, the relevant postings are displayed in blue. To edit an existing batch, right-click the selected posting to open the menu:
You can now use the first option in the context menu to select all postings in the batch for further editing. You can also remove postings that do not belong to the batch or that no longer belong to the batch (Release item(s) from batch). Click “Expand batch” to open a closed batch and view all individual postings. Once finished, you can close the batch again (Close expanded batches). |
|
Available user rights |
|
92 |
FO Correct debt |
Authorizes the user to correct a debt. |
137 |
FO Move A/R payments |
Authorizes the user to transfer a debt. |
839 |
FO AR (enter commission at payoff) |
Authorizes the user to post commissions. |
FO A/R Transfer to different account |
Authorizes the user to transfer debts to another profile or account. |
|
[Cash Register | Accounts Receivable | Payment History]
This tab shows all payments received to pay off debts.

Specify a period for which you want to view incoming payments.
The view above shows all payments received during the period selected
for evaluation. Since different outstanding items can be been combined
(to pay off credit cards), it may not always be possible to identify the
individual debts that have been paid off. If you select the  Payed off debts
option, the system displays all debts that were paid off during the specified
period.
Click [ to reload the list; e.g., if new payments have been posted in the meantime or if you change the period.
NOTE:
|
[Cash Register | Accounts Receivable | Reminders]
The Reminders tab shows all debts due based on the reminder code definition
and debts that have reached the due date for a reminder level and therefore
require a reminder. You can optionally change the filter date and filter
reminder level by selecting the relevant item from the drop-down list,
You can also select the  show
all check box to show debts that are not yet due.
Debts for which a reminder must not be issued are displayed in red. You set this requirement by assigning the relevant reminder code in the guest profile.

OI report for debtors
Click [ to view all open items for the specified date on screen.
Remind
Click the [ button to activate the reminder process for the selected items (see the “Reminder” chapter).
Rem. History
The allows you to access reminders that have already been created and sent (see the “Reminder history” chapter).
Context menu
Right-click a debt to open the context menu, which provides the following options:
View invoice form xxx |
Opens the invoice form (see the “Invoices > Invoice history” chapter). |
View invoice details xxx |
Shows the individual posting items for the invoice. This allows you to see the actual postings if postings on the invoice have been combined to form a package or if postings have been renamed. |
Edit comment |
Enter a comment for the selected debtor. |
Select status |
Enter a status defined in the system data for the debt. |
View profile yyy |
Opens the guest's profile. |
[Cash Register | Accounts Receivable | Reminders | Button [Remind]

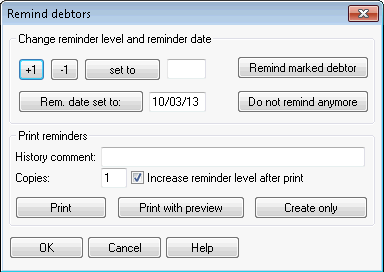
Use this dialog box to change the reminder level and reminder date for a selected account or to create and print reminders.
Increases the reminder level. |
|
Decreases the reminder level. |
|
Sets the reminder level to the level set in the input box. |
|
Sets the reminder date to the date entered. |
|
Indicates that a reminder is to be issued for the selected debtor or sets a reminder date. |
|
Indicates that the debtor is no longer to be reminded (displayed in red in the list). |
History comment |
Reminder texts are saved under Letters in the guest profile. The text entered here will appear in the comments for the entry. |
Copies |
Specifies the number of copies to be printed. |
|
Increases the reminder level by one increment once the reminder has been printed and changes the reminder date accordingly. |
Prints the reminder. |
|
Displays the reminder on screen and allows it to be edited. |
|
Generates a reminder without printing it. You can access the reminder from the History of reminders created. |
The reminder forms available for selection depend on those defined on the “Forms” tab. When printing a form, protel takes into account the language of the selected debtor and the highest reminder level for the selected debts in each account. All printed reminders are saved in the History of reminders created and the Letters tab for each profile.
Select the individual accounts on the Reminders tab. If you select multiple accounts, a reminder is created for each account in succession. One reminder is generated for each guest profile. If the same guest profile is assigned to various outstanding items, the items are combined on one reminder form (once the form has been created in the system data).
Click the [ button to open the Remind debtors dialog box.
Select the  Increase
reminder level after print check box as a general rule as this
ensures that the reminder level and date are increased automatically.
Click the [ button. If you want to view the reminders on screen first, click [.
[Cash Register | Accounts Receivable | Reminders | Button [Rem. History]
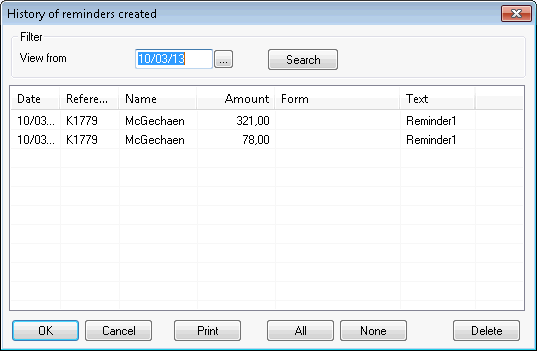
Shows all reminders created in the past with the corresponding date.
You can use the reminder history to print or delete reminders at a later point in time.

Enter a date and click [.
Select one or more reminders from the list box (use the and buttons if required).
Click [ to generate a printout or [ .
[Cash Register | Accounts Receivable | Data Exchange]
Automatic posting of incoming payments received by data exchange and printing of payment forms.
Print payment form (supported only if a Data Exchange license is installed)
The data exchange procedure allows payments transferred by a guest to be forwarded to protel automatically using banking software (e.g., “Multicash”) and posted as a payment in protel. Click the [Data Exchange] button to create bank payment/transfer forms and start the exchange of data.
|
[Cash Register | Accounts Receivable | Forms]
Use this tab to assign the forms defined in the protel system data to the relevant levels and languages so that the corresponding form can be selected when printing a reminder or account statement.
The list shows the individual reminder levels and the forms assigned to each level. The reminder level is initially assigned in the system data, but can also be assigned here.
You must create the account statement as a form with reminder level “0” in the system data. You then assign the “Statement” type in accounts receivable management. This allows account statements to be issued instead of or in addition to reminders (see “Accounts receivable” - “Accounts”).

To create the form, first use the drop-down list to select the reminder level. Assigning a language allows you to use texts created in a foreign language. For instance, if German has been entered as the guest's language in the guest profile and a reminder text exists in German, the system will automatically print the German version for this guest profile.
To create a new form, select a reminder level, a language, and the corresponding form and click the [ button. To modify an existing form, select it in the list, change the entries shown, and click [. Use the button to remove selected forms from the list.
[Cash Register | Accounts Receivable | Settings]

By default, protel HMS reorganizes fully paid off debts during the end-of-day routine 60 days after a payment has been posted. You can change this setting here.
If you select the  automatically
with EOD check box, the system will reorganize the records at the
end of the day. As an alternative, the debts can be deleted automatically
after a set number of days. To do so, enter a number in the input box.
Click the [ button to trigger a manual reorganization.
|
Available user rights |
|
802 |
FO A/R Settings |
Authorizes the user to access the “Settings” tab in accounts receivable management |