
DC Menu |
To open the DC (double-click) menu:
Click the [DC Menu] button in the Navigator
Double-click a reservation in the Room Plan or
Double-click a reservation in the reservation list.
The double-click menu lists all the actions that are also available within the room plan plus additional functions.
Always use this function for modifying reservation data because changes made here are also queried for any group members of a reservation.
The pane on the right displays the current reservation data.
The pane on the left contains the editable settings for the reservation. Simply select the relevant action and click to confirm and run the transaction.
|
Check In |
Performs check in. |
|
Check Out / Invoice |
Select this check box on the guest’s date of departure to access the guest’s invoice. If you try to complete this transaction before the date of departure, you will receive an error message advising you that the guest is not departing today. For an advanced invoice, interim invoice, or early departure, go to “Cash register - Invoice” or, if you are in the Navigator, choose Invoice. |
|
Alter Arrival |
Change the arrival date (departure date remains unchanged). Select the check box, double-click in the date box and enter a new date. For group reservations, if you complete this function for the Group Master you can execute it for all group members in one go. |
|
Alter Departure |
Select this check box to change the departure date, following the same procedure as the Alter Arrival check box. Double-click the date and enter a new departure date. For group reservations, if you complete this function for the Group Master you can execute it for all group members in one go. |
|
Shift reservation |
Select this check box to move the reservation
|
|
If the guest moves to a different room during their stay, you need to select this check box, select the new room number from the drop-down list, and enter the move date in the date box. |
|
|
Move and extend |
If the guest wishes to extend their stay, and has to move to a different room as a result of this, you need to select this check box, enter the new room number and the new date of departure. The stay will be extended until the date of departure given; the move will take place on the original date of departure. |
|
Cancel reservation |
Select this check box to cancel a reservation. In the subsequent dialog box, choose a reason for cancellation (created in the system data) and enter supplementary text, if required. |
|
Void CI status |
Select this check box to remove the checked in (CI) status for a guest. This option is not possible if charges have already been posted to the invoice. |
|
Delete blocking reservation |
Select this check box to remove a block from a room. You can also go to “Reservation”, “Block/Unblock Rooms” to block a room. |
|
Copy |
If you have regularly recurring reservations, you can use this function to copy over the details, so that you do not need to enter the same data again. Click “Copy” and choose [OK] to confirm.
Copy frequency: How often is the reservation to be copied? Example: “Monthly” would create a copy every month in the copy period selected below; for example, from day 11-14 of every month Quantity: Quantity of copies to be created (usually 1) Copy period: The period for which the copies are to be created. If you want protel to create copies for the rest of the year, you would enter today’s date in the first box and 31.12. in the second. Options: The right window pane lists the options (information) that you can choose to include in the copy/ies. Once you have made your selection, click [.
Click [ to complete the process. Confirm the subsequent prompt to view all the created reservations. Select the |
|
|
|
TIP!
|
|
|
Available user rights (DC menu) |
|
|
309 |
FO Double click menu |
Controls access to the DC menu. |
|
84 |
FO Alter date of Arrival/Dprt |
Required for users to be able to modify the arrival or departure date. |
|
85 |
FO Shift reservation |
Controls access to the “Shift reservation” function. |
|
86 |
FO Move |
Required for users to be able to move a reservation to a different room. |
|
87 |
FO Cancellation |
Required for users to be able to cancel a reservation. |
|
88 |
FO Cancel Check In Status |
Required for users to be able to remove the checked in status for a guest. |
|
330 |
FO Void CI |
Required to be able remove the checked in status. |
|
228 |
FO Copy reservation |
Controls access to the “Copy” function in the DC menu. |
|
|
Available settings (DC menu) |
|
|
![]()

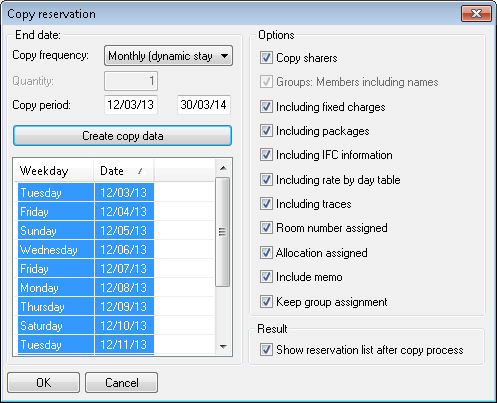
 The created copies are shown in the left pane with the arrival date and weekday. Right-click one of these days to open the
  “
“ You can only copy reservations allocated to a specific room. You cannot copy reservations that have been split across more than one room (due to a move for example).
 Go to “

