Reservation Group Reservation
Group reservation |
Front Office Reservation Group Reservation
|
|
It is advisable to create a group reservation if a customer is booking multiple rooms on a single invoice. This form of reservation also allows you to change other data, such as the arrival or departure date, for all group members at the same time.
You can of course also specify a company name, travel agent name, or source name in addition to the group name, if required. As a result, information about revenues for the company and individual groups, for example, will be available separately in the respective profiles and histories.
During creation of a group reservation, a joint group account (known as the “group master”) is created automatically and will be used for the collective invoice, among others. The group master can also be used to manage and edit the group members and other reservation information centrally. The subsequent chapters explain the group master in more detail.
Once you have finished making your entries, a prompt will appear asking if you want to create a group invoice. If you confirm the prompt, the Payment/routing instructions for the group master will appear. You can then define the precise distribution of sales (revenues), if required.
There are various ways of creating a group reservation. In addition to the method described above (Reservation > Group Reservation > New), you can also create group reservations from the room plan or room type plan.
Drag the first reservation in the required room over the required period, but do not press Enter or right-click to confirm the reservation.
Add another reservation immediately afterward by dragging a new reservation (differing arrival and departure dates are possible).
Drag as many reservations as you require.
To complete the process, press the Enter key or confirm the reservations by right-clicking and choosing “Reservation” from the context menu.
This will open the Reservation dialog box. Enter the group name in the Group box.
This opens the profile search window where you assign a group to the reservations.
Assign an existing guest profile of the “Group” profile type or create a new guest profile.
Click [OK] and click [Yes] to confirm the prompt asking if you want to create a groupmaster invoice.
Choose a routing target in the Routing instructions dialog box; for example, “Accommodation to B invoice” ([Frequently Used Instructions]).
Click [OK] and, in the dialog box that appears, choose [Group members and master].
Optional: Rooming list entry
Assigning guests to individual rooms:
From the room plan, open the reservation Navigator (right-click any individual reservation belonging to the newly created group reservation):
In the Navigator, click [GrpMaster]
In the group master, click [Grp.members].
If you only want to enter names without creating a profile for each group member, select the  Rooming list check box.
Double-click the first entry in the list to open the Navigator for the associated reservation.

The Navigator opens in “alter name” mode:
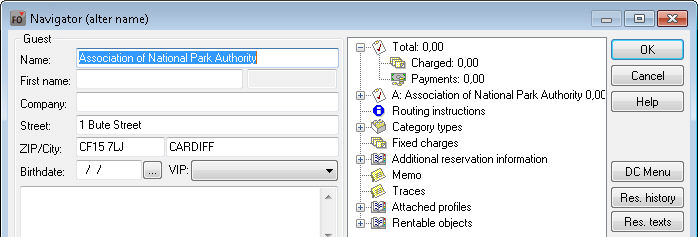
To change the name, overwrite the entry in the “Name” box.
To go to the next group member, click the page down button  .
.
Repeat steps 7-8 until you have entered a name or assigned a profile for every group member.
Click [OK] to confirm. The group reservation was created with the relevant group members:
It is very easy to create group reservations from the room type plan.
In the column to the right of the room type name, enter the number of required rooms.
Using the mouse, drag the reservation in the required room type over the required period.
Add more room type reservations if required by dragging a reservation in another room type. Enter the number of rooms required in this case too.


Fig.: This booking is for four rooms of room type PRTB and four rooms of room type STDB,
all from June 02 to 04, 2013.
Confirm the reservation by pressing Enter or by right-clicking and choosing “Reservation” from the context menu.
This will open the Reservation dialog box. Enter the group name in the Group box.
This opens the profile search window where you assign a group to the reservations.
Assign an existing guest profile of the “Group” profile type or create a new guest profile.
Click [OK] and click [Yes] to confirm the prompt asking if you want to create a group reservation.
Choose a routing target in the Routing instructions dialog box; for example, “Accommodation to B invoice” ([Frequently Used Instructions]).
Click [OK] and, in the dialog box that appears, choose the option [Group members and master].
Open the reservation by clicking  in the toolbar. Enter the reserved period.
Select the group master for the reservation (indicated by room type “GRP MST”) and right-click:
In the Navigator that appears, click  .
.
In the next window, click the  button.
In the Room Allocation dialog box, click  to allocate rooms to the individual partial reservations.
Optional: Rooming list entry - Assign guests to individual rooms.
-> See above: “From the room plan > Rooming list entry”.
Open the menu “Reservation > Group Reservation”, enter the profile search data, and follow the procedure described in the “Finding and creating a reservation” section.
Click [New] to enter all additional information, such as arrival and departure, room type, occupancy/room etc. in the Reservation dialog box:
Click [OK] to confirm the Reservation dialog box and click [Yes] to confirm the prompt asking if you want to create a group master invoice.
Choose a routing target in the Routing instructions dialog box; for example, “Accommodation to B invoice” ([Frequently Used Instructions]).
Click [OK] and, in the dialog box that appears, choose the option [Group members and master].
This will open the group window. Select the group master (indicated by room type “GRP MST”) and right-click:
In the Navigator that appears, click .
Optional: Rooming list entry - Assign guests to individual rooms.
-> See above: “From the room plan > Rooming list entry”.
a) From the room plan:
Post the additional reservation:
In the Reservation dialog box, enter the group name in the “Group” box:
The reservation will be added automatically to the group reservation with the same group name.
b) From the group master
Open the group reservation, by clicking the button in the toolbar for example.
Select the group master for the reservation (indicated by room type “GRP”) and right-click.
In the Navigator that appears, click .
To add an existing reservation to the group, click  or, to create a new individual reservation to add to the group, click
  .
.
|
NOTE
|
|
ATTENTION
|
|
|
Available Settings (add group members) |
|
When a reservation is added to a group reservation afterwards, the contents of the group master's notice fields can be automatically adopted, if desired. |
|
|
|
Available user rights (add group members) |
|
|
340 |
FO Group members - add to group |
Controls access to the “Add to group” button in the group members dialog box of the group master. |
If you want to void the entire reservation, follow the same procedure as for a normal reservation (double-click within the room plan, select the “Void” button, and click to confirm). The delete procedure is also the same; go to the “More... button” in the Navigator.
However, if you want the individual reservation to be retained and only removed from the group, you need to remove the group name in the Reservation dialog box.
An even easier option for removing individual reservations is to click the button in the group master Navigator. Select the relevant entry in the group members dialog box and then click the  button.
|
|
Available user rights |
|
|
341 |
FO Group members - exclude from group |
Controls access to the “Remove from group” button in the group members dialog box of the group master. |
To open the group master, do one of the following:
Right-click a group reservation in the room plan and, in the Navigator, click  .
.
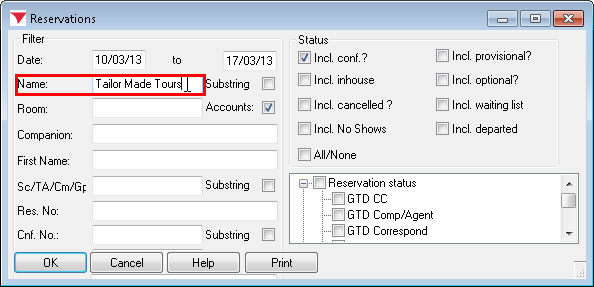
Search for the group reservation in the reservation list ( button)...
...and right-click the group master (indicated by room type “GRP”).
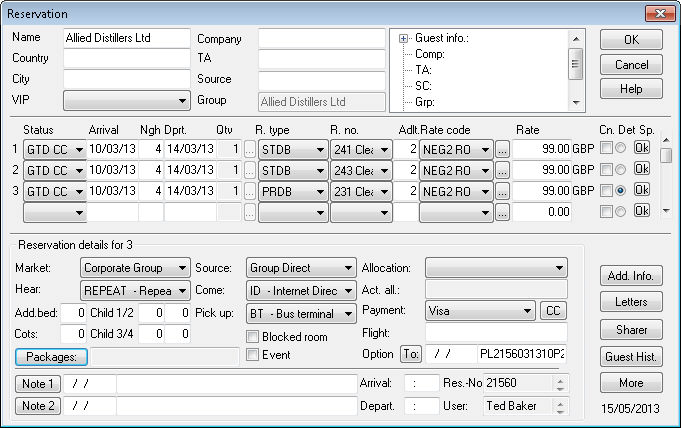
Unlike a standard room reservation, the group master is identified by the group room type (GRP MST).
Instead of the room number, the group master is assigned a group account (usually with a nine thousand number range):
|
Fig.: Group master - Reservation information
Fig.: Group master in the room plan (scroll right |
The group account that is additionally posted when creating a group reservation is used for creating the collective invoice and for centrally managing the group reservation.
All group-relevant changes must be made in the group master. After every change, the “Group action” prompt appears, asking to which reservation you want the changes to be applied. You have to choose one of the following options:
|
|
Group members and master Group members only Groupmaster only Member selection |
Changes that apply to an individual guest or the group account only are typically made from the room plan or Navigator, for example.
In the group master Navigator, click the to access the list of all group members.
Double-click a group member in the list to access Change name mode. You can use this window to enter the names of group members one after the other. Simply overwrite the displayed name with the actual guest name. The same applies for changes to all the other data for group members in the Navigator.
Once you have opened the Navigator for one group member, simply use the page up  and page down
  buttons to toggle between group members.
Names of voided group members are displayed in the member list in red font.
Context menu
Right-click the list header to open the context menu.
From the context menu, you can:
Print the group member list in various font sizes (small/medium/large):
If you want to print the entire list, make sure that none of the rows are selected.
Select a row in the table, then open the context menu and choose Print with small font, Print with medium font, or Print with large font to print only this row.
Export the Allocation overview to an Excel or HTML file
Adjust the column width in the overview
Search in the overview
Activate edit mode (“Edit mode on”):
You can edit the name, first name & salutation columns directly if you select “Edit mode on” in the context menu. You can then click the relevant name directly in the overview and make the necessary changes. To go to the next box, press the [TAB] key, the right arrow, the left arrow, or the ENTER key. The newly entered values will be changed directly. If a dedicated profile has yet to be assigned to the reservation, a new guest profile will be assigned when the name, first name, or salutation is changed; if a guest profile already exists, the name/first name/salutation entries will overwrite the data for the existing profile. If the  Rooming list check box has been selected, new profiles (when these are created) will be created with the option “Delete profile as soon as possible” selected.
|
|
Available user rights |
|
|
323 |
FO Group members |
Controls access to group members in the group master Navigator. |
If you confirm the button from the Group master Navigator, you can also create a group confirmation retroactively because in this case all the group members are included in the confirmation (provided an appropriate form has been created in the system data).
Double-click the group account in the room plan to open the DC (double-click) menu.
After selecting the Alter Arrival or Alter Departure check box, enter the new date and click [ to confirm. The Group action dialog box appears. If you want to change the arrival or departure date for the entire group, click [Group members and master].
To change the arrival or departure date for specific members of the group only, click [Member selection].
|
Such changes cannot be applied to individual reservations for which a move has been stored. Similarly, when changing the arrival or departure date, the posted rooms always have to be available in that period. If a room is not available in the requested period, the arrival or departure date for the reservation in question will not be changed, and a system message will inform you of this. Reservations will also be changed if their arrival and departure dates match those of the group master. |
Open the group master Navigator. In the lower left Reservation pane, select the Rate: New check box and change the rate as required. Click to confirm your entry. The “Group action” prompt appears, where you can choose the reservation to which you want the changes to be applied. In this case, you would typically choose the “Group members only” option.
Open the group master Navigator. In the lower left Reservation pane, change the rate code as required. Click [ to confirm your entry.
The “Group action” prompt appears, where you can choose the reservation to which you want the changes to be applied. In this case, you would typically choose the “Group members only” option. Depending on the rate codes created in the system data, it might not be possible for the rate code change to be applied for all rooms. If this is the case, a system message will inform you of this.
Double-click the group master within the room plan, the reservation list, or the inhouse list to open the DC (double-click) menu.
After selecting the Cancel reservation radio button and clicking [ to confirm, the “Group action” prompt appears, where you can choose the reservation to which you want the changes to be applied.
Double-click the group account within the room plan (scroll right down) or the reservation list.
 |
Fig.: Group accounts in the room plan (identifiable by the "GRP" attribute). |
 |
Fig.: Selected group account in the reservation list. The group master is identified by the group room type (GRP MST). |
The DC (double-click) menu opens.
Select the Check In radio button and click [ to confirm.
The “Group action” prompt appears, where you can choose the reservation to which you want the changes to be applied. Since the group master is also to be checked in, it is advisable to select Master “Group members and master”.
The group check out procedure is different from that described above.
The easiest way to do this is from Departures because it is often the case that some of the group guests will still have a balance left to pay (meaning that an invoice still has to be printed out) and some will not.
Open Departures (F7).
Filter the departures list by group by searching for the group name directly. You will then only see a list of the guests in this group
You can select individual guests for check out or click [
Click the  button. The guest invoices will now open one after the other (if you have selected more than one or all of them), and you can edit each invoice as required. The invoices for guests who have no balance left to pay will not open and will be checked out directly.
Double-click the group account in the room plan to open the double-click menu.
 |
Fig.: Displaying group accounts in the room plan |
After selecting the Void CI status check box and clicking to confirm, the “Group action” prompt appears, where you can choose the reservation to which you want the changes to be applied.
To create a group invoice, click the [More] button from the group master Navigator to go to the “Payment/Routing instructions”.
Define which charges are to be transferred to the group master: Click [New] and click [OK] to select the relevant accounts.
Choose a routing target, for example “Within the folio to B”
Also select option “Route to group master”:
Click [OK] to confirm the dialog box.
A message box appears, asking to which reservation you want to apply the changes. Choose [Group members and master] to route the selected charges of all group guests to the master.
 See also “Navigator > The More... button > Payment/routing instructions”
|
NOTE:
|
|
|
Available user rights |
|
|
96 |
FO Transfer to Group Master |
Authorizes a user to transfer group member charges to the group master. |
Open the group master Navigator; by right-clicking the group account from within the room plan for example.
Right-click in the Invoice pane to open the invoice dialog box.
In the lower right of the invoice dialog box, click the  button.
Enter the TAA number, the quantity, and the amount for each room, and click to confirm.
The “Group action” prompt appears, where you can choose the reservation to which you want the changes to be applied.
With this option, room rates that are still to be posted and the fixed charges created for the group up to the date of departure are posted automatically.
Open the group master Navigator; by right-clicking the group account from within the room plan for example.
Right-click in the Invoice pane to open the invoice dialog box.
From the invoice dialog box, click the  button.
A dialog box appears featuring the , , and buttons.

Now choose to post the room rates still to be posted & fixed charges for group guests to the group master.
This is very time and process intensive. Do not cancel this operation! Note that this triggers the posting of all revenues for the entire group and may therefore cause a shifting of the revenues in your statistics.
![]()
 It is important to use different names for different groups that are making reservations for the same period. Otherwise, you will find it very difficult to distinguish one group from another.
 If
If